Angular 10 Star Rating Example
In this tutorial, we'll build a star rating component with the latest Angular 10 version and Bootstrap.
Star rating is a common feature in product recommendation and eCommerce websites
We commonly rate something between zero and five stars.
Before getting started you need a few prerequisites:
- Basic knowledge of TypeScript. Particularly the familiarity with Object Oriented concepts such as TypeScript classes and decorators.
- A local development machine with Node 10+, together with NPM 6+ installed. Node is required by the Angular CLI like the most frontend tools nowadays. You can simply go to the downloads page of the official website and download the binaries for your operating system. You can also refer to your specific system instructions for how to install Node using a package manager. The recommended way though is using NVM — Node Version Manager — a POSIX-compliant bash script to manage multiple active Node.js versions.
Note: If you don't want to install a local environment for Angular development but still want to try the code in this tutorial, you can use Stackblitz, an online IDE for frontend development that you can use to create an Angular project compatible with Angular CLI.
Step 1 — Installing Angular CLI 10
Let's begin by installing the latest Angular CLI 10 version (at the time of writing this tutorial).
Angular CLI is the official tool for initializing and working with Angular projects. To install it, open a new command-line interface and run the following command:
$ npm install -g @angular/cli
At the time of writing this tutorial, angular/cli v10 will be installed on your system.
Step 2 — Creating a New Angular 10 App
In the second step, let's create our project. Head back to your command-line interface and run the following commands:
$ cd ~
$ ng new angular10star-rating
The CLI will ask you a couple of questions — If Would you like to add Angular routing? Type y for Yes and Which stylesheet format would you like to use? Choose CSS.
Next, navigate to you project’s folder and run the local development server using the following commands:
$ cd angular10star-rating
$ ng serve
Open your web browser and navigate to the http://localhost:4200/ address to see your app running.
Step 3 — Installing Ng-Bootstrap
Next, we need to install ng-bootstrap using the following command:
$ ng add @ng-bootstrap/ng-bootstrap
This library provides an Angular implementation for Bootstrap 4 and also provides some useful components such as NgbRating -- a directive that allows you to display star rating bar.
Open the src/app/app.component.ts file and update it as follows:
import { Component } from '@angular/core';

@Component({
  selector: 'app-root',
  templateUrl: './app.component.html',
  styleUrls: ['./app.component.css']
})
export class AppComponent {
  currentRate = 0;
}
Next, open the src/app/app.component.html file and update it as follows:
<h1 class="text-primary">
Angular 10 Start Rating Example
</h1>
<ngb-rating [max]="5" [(rate)]="currentRate" [readonly]="false"></ngb-rating>
<p>Rate: </p>
Next, open the src/app/app.component.css file and add the following CSS styles:
ngb-rating {
  font-size: 100px;
  color:brown;
  background: rgba(23, 221, 16, 0.815);
}
This is a screenshot of the output:
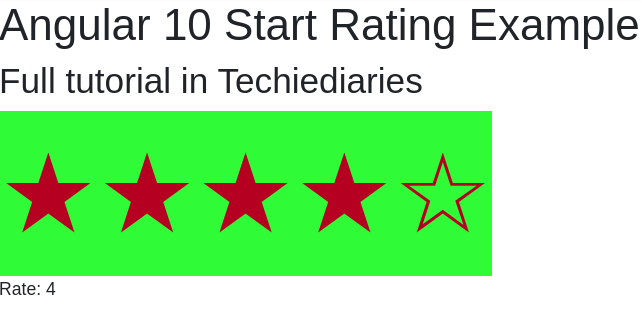
You can find this example in https://stackblitz.com/edit/angular-10-star-rating-example
Conclusion
In this short article, we've seen how to create a star rating component with Angular 10 and ng-bootstrap. Read the official docs for more details.
-
Date:

Think Python

Python for Data Analysis

Automate the Boring Stuff with Python

Small Python Projects

Learn More Python 3 the Hard Way

The Quick Python Book

Python Beyond the Basics

Clean Code in Python
Awesome Vibe Coding
A curated list of vibe coding assistants, IDEs, tools and references for learning how to efficently collaborate with AI to write code. Best practices of prompt enginnering for developers. AI-powered tools for coding and UX/UI design. Our focus is on tools that allow for generating code or designs using natural language prompts.
