Git and GitHub for JavaScript/Angular Developers with VS Code
If you have previously worked with a JavaScript/Angular project, there is a good chance that you have some changes that broke your code and prevented it from running correctly but you were not sure how to roll back to the previous version of your code. This happens all the time to all developers, particularly in large projects or even in same projects if you are still learning how to use your tools or still learning to work with JavaScript/TypeScript or Angular.
Software developers had come up with a solution for this kind of issues a long time ago which is refereed to as version control systems. Even if you are not expert, you likely have used a version control system before in some way.
Version control systems are such as indispensable tool in modern web development that can help you solve many issues related to every tasks. Git is one of the most popular version control systems nowadays.
Throughout this tutorial, We’ll learn together from the basic steps what Git is, how to use it for your web development projects with JavaScript and Angular, and how to use it along with GitHub to collaborate with other developers that are part of your team or if you just want to contribute to other open-source projects.
We’ll learn how to create a GitHub repository, how to add your project's source code files, and how to control your project’s history so you can “travel in time” when developing your new JavaScript or Angular project. This means you don't have to worry about breaking your code since you can roll back to the previous version of your working code any time you need!
How to Install Git?
Let’s assume, you don't have Git installed on your development machine and start with the general instructions that you can follow to install it. In most operating systems, the installation process is quite easy and straightforward.
You can install or update Git via a package manager, binary installers, or download the source code and compile it.
Installing Git on Linux and macOS
You can install Git on Linux via your system package management tool. For example, on Fedora (or any RPM-based distribution, such as RHEL or CentOS), you can use dnf as follows:
$ sudo dnf install git-all
On Debian-based systems, such as Ubuntu, you can use apt as follows:
$ sudo apt install git-all
Please refer to the official Git website for instructions on how to install it on the other Unix distributions.
For macOS. You can download and use a Git installer at https://git-scm.com/download/mac. This is only required if you didn’t previously install the Xcode Command Line Tools.
Installing Git on Windows
Installing Git on Windows is different, you need to use a separate project called Git for Windows which is independent from the official Git project. You can download the installer from Just go to https://git-scm.com/download/win and follow the setup process which is similar to any typical Windows program.
What’s Git?
Now that we have installed Git in our development machine, let’s get back to the fundamental concepts of the most popular version control system.
So, what’s Git?
Git is a distributed version control system. It seems that each one of these terms needs its own explanation! Let’s understand what each term means.
A version control system is a set of tools that keep track of the version history of your files. This means, Git (or any other version control system) can be used to save the state of your files at any point of time. Therefore, you can keep working on your files by changing the content or deleting the files and restore the previous state at any time if you have an issue or you just changed your mind.
This is quite similar to making a system backup of your hard-drive files but at a granular level.
In the world of Git, we save the state by making a commit.
Git allows you to add a message to your commit command which helps you or other developers to quickly understand what changes have been made.
Even further, Git allows you to check the history of all of the commits and the corresponding messages. Provided that you have used the right messages, which is completely up to you and Git can’t doing anything about this, this can help you see a complete overview and history of your project.
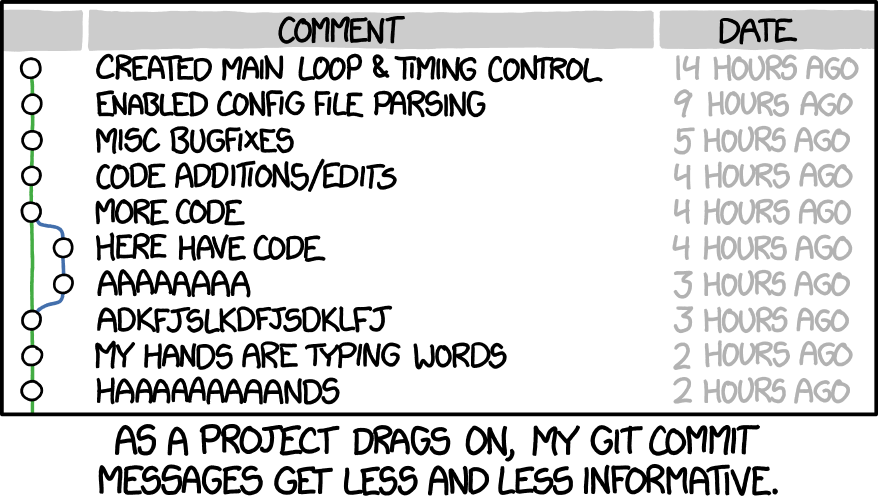
Since commit messages are important but Git doesn't enforce any guidelines for writing these messages since they are designed, in the first place, for humans — software developers have come up with various conventions that provide easy set of rules for writing commit messages.
When you are contributing to open-source projects, you'll be obliged to adhere to the commit message format and conventions used by the developers of the project. If you are working with a team in a project, you need to make sure you agree on some conventions for writing messages, this makes collaboration much easier and productive.
These are great examples of open-source repositories with concise and consistent commit messages:
Here is what Peter Hutterer said about writing good commit messages:
Re-establishing the context of a piece of code is wasteful. We can’t avoid it completely, so our efforts should go to reducing it [as much] as possible. Commit messages can do exactly that and as a result, a commit message shows whether a developer is a good collaborator.
See: - How to Write a Git Commit Message, - Commit Message Guidelines, - Conventional Commits: A specification for adding human and machine readable meaning to commit messages
Git doesn't only provides you with a log of changes you’ve made in your code, but also enables you to compare your source code files between different commits. Most importantly, Git allows you to restore any files to a previous commit with a simple command.
Distributed Version Control Systems
Now that we have hopefully understood what a version control system is, what about the distributed version control system?
In the early days of version control systems, developers used to store their code repositories (a set of commits) in their local hard drive — which is was a good step ahead — than using no version control, since they can control and roll back to previous versions of their code at any point of time with complete ease. But in most cases a software or web development project don't involve only one developer but multiple developers working, simultaneously in the same codebase as a team, toward completing the project so the approach of storing the commits locally was not so helpful at this scale.
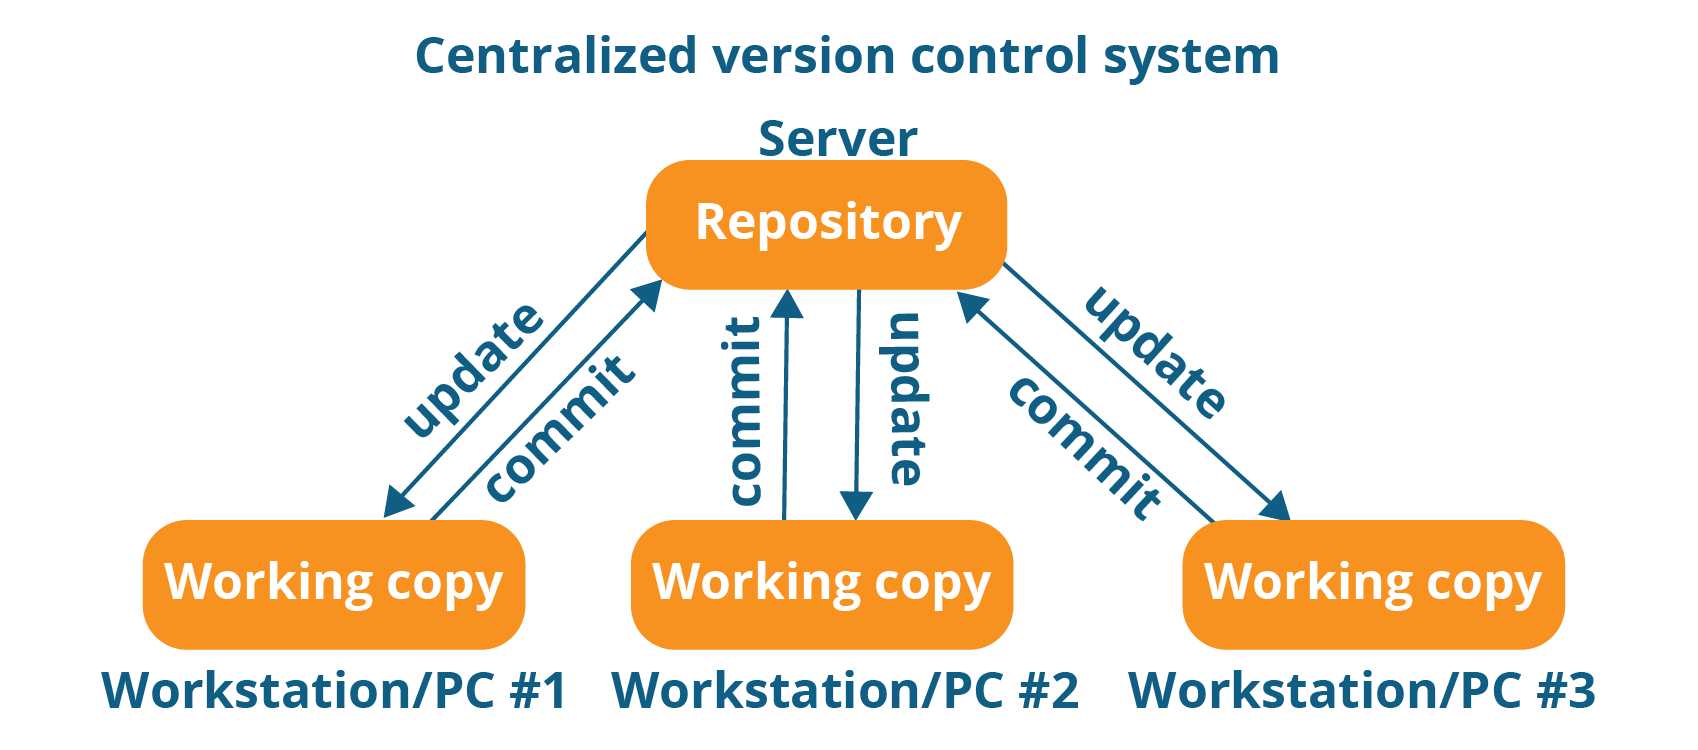
As the need for more collaboration on projects has raised, version control systems were adapted to store repositories on a central server that was accessed by the whole team. This was much helpful but has other drawbacks, such as file locking. You can refer to this as a Centralized version control system.
Here is a definition of a centralized version control from this Atlassian article:
Centralized version control systems are based on the idea that there is a single “central” copy of your project somewhere (probably on a server), and programmers will “commit” their changes to this central copy. “Committing” a change simply means recording the change in the central system.
This is a diagram that shows the high level working of centralized version control system:
Git is Not a Centralized Version Control System
Git is not a centralized version control system, since it doesn’t require a central server that has the definitive version of the code repository.
Distributed version control provides an increased performance and a better collaboration between developers, but it’s also more complex to handle especially when synchronizing the work of multiple developers after they have worked offline for some time.
What About GitHub?
In our modern days, most remote teams collaborate using GitHub as a central server but this doesn't mean that Git is a centralized system, since this is only required for sharing the codebase but not required by Git itself. Your code is available in your local repository and the commits are pushed to GitHub only when developers decide so.
This is a diagram showing the working of a distributed version control system:
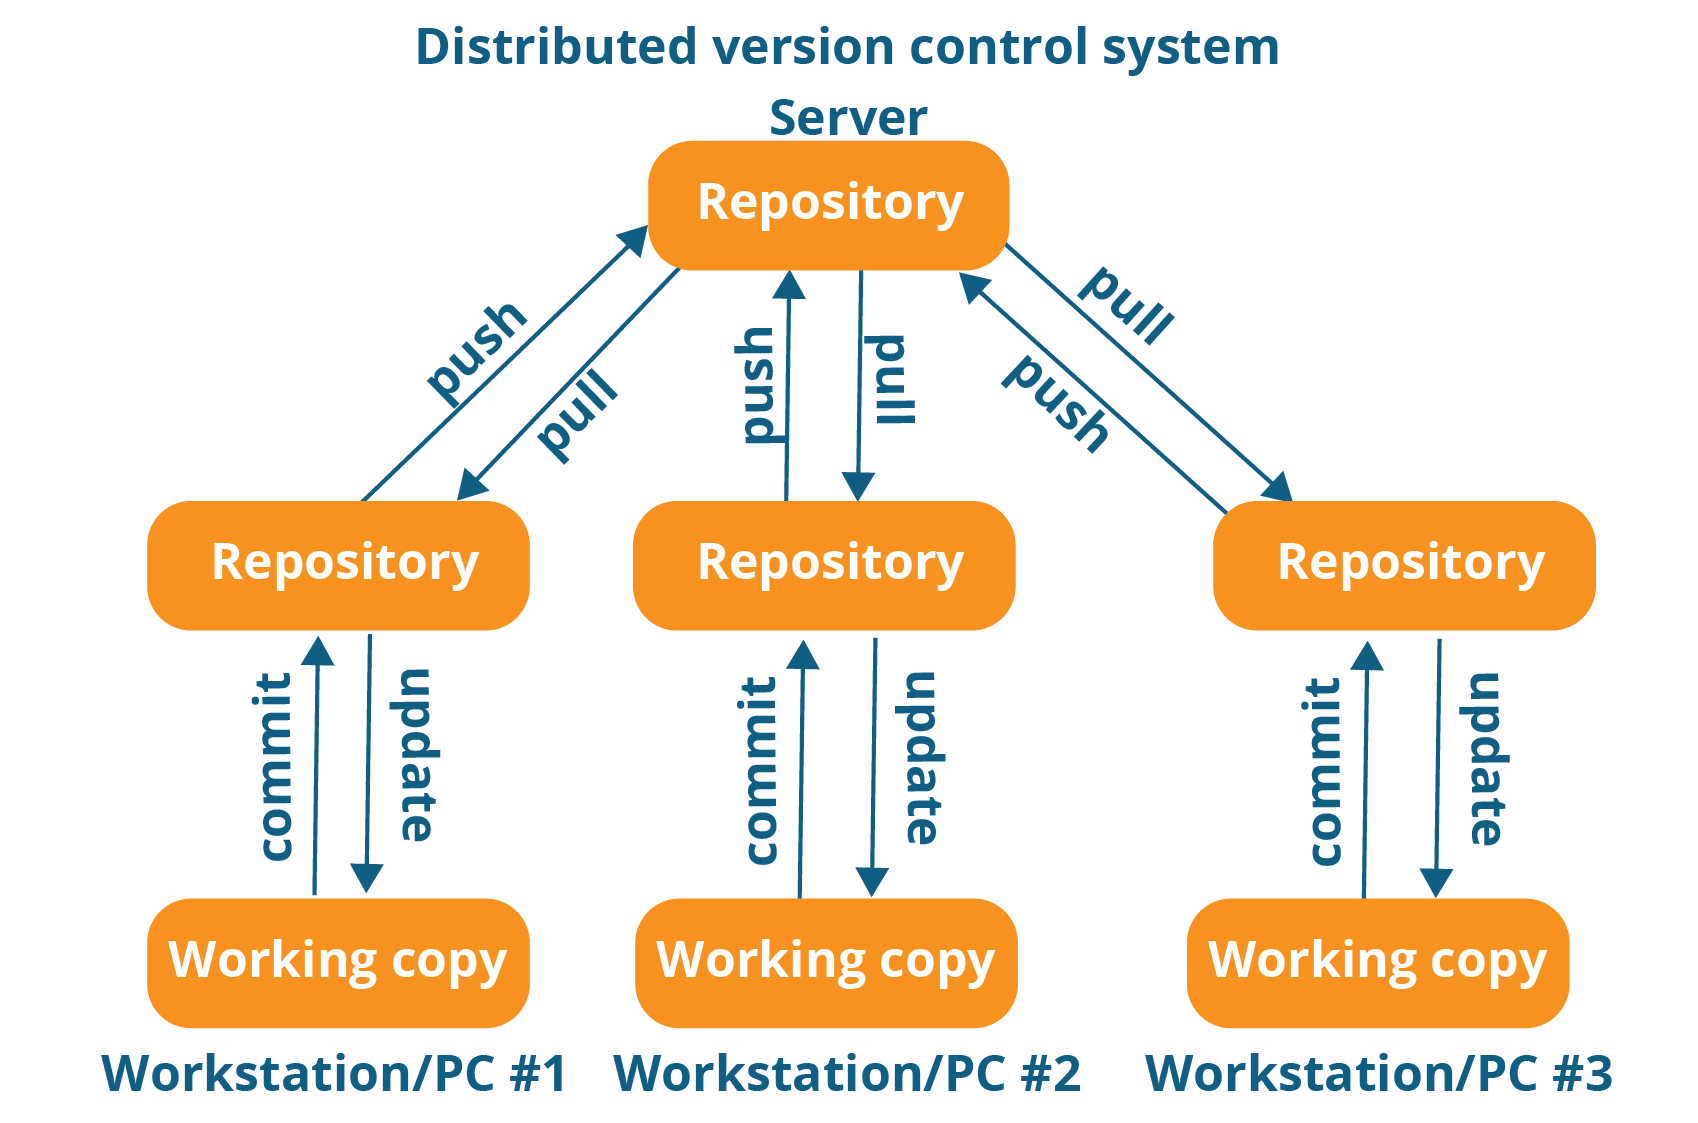
In a distributed version control system, developers need to download (clone) a copy of a repository, which contains the full history and metadata of the original codebase, on the local hard drive.
See Centralized vs Distributed Version Control Systems.
How to Use Git & GitHub
Now that we’ve understood what a distributed version control is and what Git is, let’s learn how to practically work with it. We’ll learn how to use Git in our local development machine. Then, we’ll learn how to use it with GitHub to share our code with our team of developers or the whole world as an open-source project.
Configuring Git User Credentials Globally: Identifying Yourself to Git
Before working with Git, you first need to configure your user name. You can set your username with the git config command as follows:
$ git config --global user.name "User Name"
You can also add your email as follows:
$ git config --global user.email [email protected]
The user name is arbitrary, but it's recommended that you use your full name. Whereas your email is particularly required if you collaborate with other developers using a central repository such as GitHub or a private server.
You can check your configured identity, by listing the configuration variables with the following command:
$ git config --list
The previous command will set your credentials globally on your development machine i.e these are the default credentials that will be used with all Git repositories.
Configuring Git User Credentials Per Repository
Sometimes, you'll need to set an identity for each repository, particularly the email part. For example if you work with multiple organizations. In this case, you'll need to set credentials per repository alongside with your global credentials that will be used by default when the per-repository credentials are not available.
To set your credentials per a repository , run the following commands:
$ cd [path/to/repo]
$ git config user.name "User name"
$ git config user.email "[email protected]"
Make sure you navigate to your repository folder before you run the git config command.
That’s enough at this point, we’ll see next how to also configure your GitHub credentials with Git.
How to Create a New Git Repository
Now that you have configured Git with your global credentials, you can create a Git repository to start versioning your JavaScript/Angular project.
You can create a repository using the git init command inside your JavaScript project's folder as follows:
$ cd angularproject
$ git init
This will initialize an new and empty repository.
If you have generated a project with Angular CLI, this latter will automatically invoke Git and initialize a new repository and even further make the first commit of your Angular code at that point.
If you generated an Angular project, head over to your terminal, navigate inside the project's folder and run the following command:
$ git log
You'll get a similar output :
commit b2f1d7463e2287035a0f94d011d32a4b432d3fbe (HEAD -> master)
Author: techiediaries <[email protected]>
Date:   Fri Apr 17 12:50:28 2020 +0100

    initial commit
We get information about the first commit with the initial commit message.
We'll see later how you can configure your repository to push it to GitHub.
You can check the status of your repo using git status command. Head back to your command-line interface and run:
$ git status
Git in VSCode
Visual Studio Code has integrated source control and includes Git support in-the-box. Many other source control providers are available through extensions on the VS Code Marketplace.
You can use this extension, for GitHub support.
In this tutorial, we'll see how to initialize an Angular 10 project and configuring it with VS Code and Git to push our code to a remote GitHub repository.
Visual Studio Code (VS Code) is nowadays one of the most popular code editors among web developers. It became popular thanks to its many built-in features such as source control integration, namely with Git. Integrating Git with VS Code makes your development more efficient and robust.
Installing Angular CLI 10 and Initialize a New Project
Make sure you have Node.js, npm and Visual Studio Code installed on your development machine and start by running the following command in your terminal:
$ npm install --global @angular/cli@next
We use the next tag to install the latest pre-release version of Angular which version 10 at the time of writing this tutorial.
Next, create a new Angular 10 application from the command line interface using the following command:
$ ng new MyAngular10App
You'll be prompted for a couple of questions, which you can answer as you see fit as they will not affect how we configure Git with our project.
Opening your Project in Visual Studio Code
Head back to your terminal and run the following commands to open your Angular 10 project is Visual Studio Code:
$ cd MyAngular10App
$ code .
You can also open VS Code first from its launcher and open your project's folder from the code editor.
Now, you can use the built-in terminal in Visual Studio Code which can be opened via the keyboard shortcut CTRL + ` on Linux, macOS, or Windows.
When you have created a project with Angular CLI, it has also initialized an empty GIT repository in your project and even made a first commit for the generated source code.
You can make sure of that by looking at the log of the git commits inside your project's folder by simply running the following command:
$ git log
You'll have a similar output:
commit b2f1d7463e2287035a0f94d011d32a4b432d3fbe (HEAD -> master)
Author: techiediaries <[email protected]>
Date:   Fri Apr 17 12:50:28 2020 +0100
    initial commit
Linking a Remote GitHub Repository
Git is a distributed source control system which doesn't need a central repository server like GitHub but for the sake of sharing your code with other developers in your team or worldwide, GitHub is the right platform nowadays!
If you want to collaborate with your team on the same Angular project or you just want to keep a remote copy of your project's source code, then you need to add a remote GitHub repository to your Git repository which will allow you to push, pull and synchronize the code between the local and remote repositories at any point.
The first step is to set up your GitHub user's credentials (email and name used when you signed up for your GitHub account) with Git.
Head back to your terminal and run the following commands:
$ git config --global user.name "Your user name"
$ git config --global user.email "[email protected]"
You can actually add any name you want but make sure you use the right email address.
Next, you need to go to your GitHub account and create a new empty repository. Make sure to note the URL of your repository.
Pushing your Angular 10 Code to GitHub
Open the src/index.html file and add some changes. You can change the title for example.
Head to the Source Control panel where you can see that your changes are recognized by Git. You'll see the name of the changed file with the letter U next to it. U stands for untracked file, which marks a file that is new or changed, but has not yet been added to the repository.
Next, you need to click on the plus icon for the index.html file to track the file by the repository.
After that, the letter next to the file will become A. which means the file that is added to the repository.
Next, you need to commit your changes, enter a commit message in the input box at the top of the Source Control panel and, click the check icon to make the commit.
After adding your remote repository to your local Git repository using the following command:
$ git remote add origin <URL-OF-YOUR-REPOSITORY>
You can push your code to GitHub using either the command-line or VS Code:
$ git push
-
Date:

Think Python

Python for Data Analysis

Automate the Boring Stuff with Python

Small Python Projects

Learn More Python 3 the Hard Way

The Quick Python Book

Python Beyond the Basics

Clean Code in Python
Awesome Vibe Coding
A curated list of vibe coding assistants, IDEs, tools and references for learning how to efficently collaborate with AI to write code. Best practices of prompt enginnering for developers. AI-powered tools for coding and UX/UI design. Our focus is on tools that allow for generating code or designs using natural language prompts.
