In this tutorial designed for Angular developers, you'll learn about JavaScript Promises introduced in ES6 and you'll see how you can use them with an Angular 7/8 example.
JavaScript was originally created for adding interactivity to web pages. If you have written any serious JavaScript code before, then you are most likely familiar with the concept of callback functions which are very common in JavaScript because simply, they are required to handle asynchronous events when users interact with a web page.
Callback functions are not called immediately but instead when the corresponding events are triggered. At the beginning that was fine but when developers started to build complex and rich apps with JavaScript for modern browsers, callbacks became a pain and resulted in what's known as the callback hell which occurs when callback functions are nested in other callbacks at one or more levels.
As a solution to the callback hell, ES6 introduced Promises which are simply a modern and powerful abstraction for writing asynchronous code in a better and easily maintainable way.
Since Angular 2+, asynchronous code is mostly handled using RxJS Observables which are deeply integrated within the Angular APIs but Promises do still have their place since they are part of the modern JavaScript standard.
Let's see by example how to use Promises in Angular 8 example.
As this is a simple example, we don't need to create a development environment and start an Angular project from scratch with Angular CLI, we can simply use Stackblitz, an online IDE for front-end development.
Head to https://stackblitz.com/, register for an account using your GitHub account and START A NEW APP based on the Angular template. That's it! You are ready to start experimenting with Angular right from your web browser without installing a local development environment.
What's a Promise in JavaScript?
In JavaScript, a promise is an API abstraction that allows you to handle asynchronous operations synchronously.
Let's say, you want to work with some fetched data from a remote server. Since this is an asynchronous operation (i.e your code needs to wait for the server response before it can proceed with its execution), instead of waiting for the data to be fetched, we can create a promise that handles the situation and allow the app to continue running other operations.
When data is fetched, the promise will know what to do with it. This is similar to callbacks but promises have a better API and features.
How to create a Promise?
You can create a promise, using an easy to use JavaScript API introduced since ES6 or JavaScript 2015. This an example of a simple promise object that returns I promise to return this after 1 second!
var promise = new Promise(function(resolve, reject) {
  setTimeout(function() {
    resolve('I promise to return this after 1 second!');
  }, 1000);
});
promise.then(function(value) {
  console.log(value);
});
You first create an instance of Promise and provide a function, called the executor, with two arguments - resolve and reject. In the body of the function, you put your asynchronous code. In this case, it's a simple timeout function that resolves the promise after one second.
When your asynchronous code executes successfully, you need to call the resolve() function that takes as argument the value that needs to be returned, if any, or nothing. If something goes wrong, you need to call the reject() method instead which can also take a value like the error that occurred for example.
After creating the instance of the promise, you need to call its then() method with a function as an argument. This function will be executed when the promise is resolved. The then() method can take another function as the second argument which will be called when the promise is rejected.
At the points where the resolve and reject functions are called, the promise is resolved or rejected. The executor function calls some asynchronous code, and once that completes, either call the resolve function to resolve the promise or reject it if an error occurred.
A Promise can be in one of the following states:
-
pending: this is the initial state, neither fulfilled nor rejected. -
fulfilled: the operation completed successfully. -
rejected: the operation failed.
The Promise object has the following methods:
Promise.prototype.catch():Promise.prototype.finally()
- Promise.prototype.then():
Promise.all(): It wait for all promises to be resolved, or for any to be rejectedPromise.allSettled(): It wait until all promises have settled (each may resolve, or reject).Promise.race(): It waits until any of the promises is resolved or rejected.Promise.reject(): It returns a newPromiseobject that is rejected with the given reasonPromise.resolve(): It returns a newPromiseobject that is resolved with the given value.
Promise Example with HttpClient and Angular 7/8
Now, let's see how to use promises with Angular 7/8. Head back to your Angular project in the online IDE and let's start by setting up HttpClient for sending API requests to web servers for creating or fetching data.
Fetching data is a common asynchronous operation as you always have to wait for an amount of time to receive the requested data. In Angular 7/8, you can use HttpClient for fetching data.
HttpClient makes use of RxJS Observables for handling asynchronous operations, let's see how to use JavaScript/ES6 Promises instead.
In the app/app.module.ts file of your project, add the following changes:
import { NgModule } from '@angular/core';
import { BrowserModule } from '@angular/platform-browser';
import { FormsModule } from '@angular/forms';
import { HttpClientModule }  from '@angular/common/http';

import { AppComponent } from './app.component';
import { HelloComponent } from './hello.component';

@NgModule({
  imports:      [ BrowserModule, FormsModule, HttpClientModule ],
  declarations: [ AppComponent, HelloComponent ],
  bootstrap:    [ AppComponent ]
})
export class AppModule { }
You simply import HttpClientModule and add it to the imports array of AppModule.
That's you can now inject HttpClient in a component and use it to send API requests.
Open the app/app.component.ts file and start by importing and injecting HttpClient:
import { Component, OnInit } from '@angular/core';
import { HttpClient } from '@angular/common/http';

@Component({
  selector: 'my-app',
  templateUrl: './app.component.html',
  styleUrls: [ './app.component.css' ]
})
export class AppComponent implements OnInit  {
  name = 'Angular';
  apiUrl = 'https://www.techiediaries.com/api/data.json';

  constructor(private httpClient: HttpClient){}
 }
We also import and implement OnInit, so we can use the ngOnInit() life-cycle method. Next, we declare the apiUrl variable that holds our data endpoint.
Next, let's define a fetchData() method and call it from ngOnInit() as follows:
export class AppComponent implements OnInit  {
  name = 'Angular';
  apiUrl = 'https://www.techiediaries.com/api/data.json';

  constructor(private httpClient: HttpClient){}

  ngOnInit(){
    this.fetchData();
  }

  private fetchData(){}
}
Now, we need to add data fetching in the fetchData() method.
We can send a GET HTTP request using the get() method which returns an RxJS Observable but we can get a JavaScript Promise by using the toPromise() method of Observable:
  private fetchData(){
    const promise = this.httpClient.get(this.apiUrl).toPromise();
    console.log(promise);
  }
We call the get() method with our API URL and we call the toPromise() method to get a promise from the returned promise.
The API request will not be sent until we call the then() method of the promise as follows:
private fetchData(){
const promise = this.httpClient.get(this.apiUrl).toPromise();
console.log(promise);
promise.then((data)=>{
console.log("Promise resolved with: " + JSON.stringify(data));
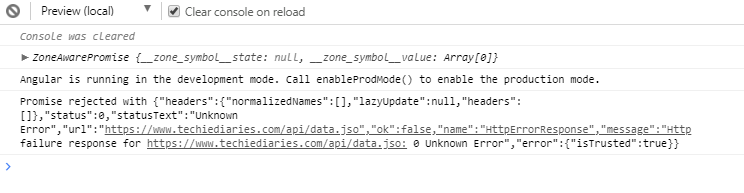
}, (error)=>{
console.log("Promise rejected with " + JSON.stringify(error));
})
}
The then() method takes two argument functions that will be respectively called when the promise is resolved with fetched data or rejected with an error:
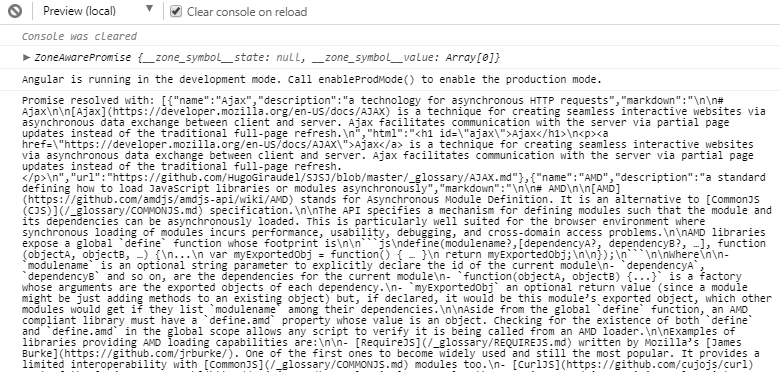
The promise is resolved with the fetched data.
You can also write the previous code as follows:
  private fetchData(){
    const promise = this.httpClient.get(this.apiUrl).toPromise();
    console.log(promise);
    promise.then((data)=>{
      console.log("Promise resolved with: " + JSON.stringify(data));
    }).catch((error)=>{
      console.log("Promise rejected with " + JSON.stringify(error));
    });
  }
Now, the data handling and error handling code are separated.
You can provide a bad URL to see the promise rejected with the error:
You can find the example from this link.
Conclusion
Throughout this tutorial, we've learned about JavaScript Promises, introduced in ES6 with an Angular 7/8 example.