Laravel 8 Drag and Drop File/Image Upload UI Using Dropzone.js Example with Progress Bars and Image Previews
Throughout this tutorial, we'll show you by example how to use Dropzone.js in Laravel 8 to drag, drop and upload single or multiple file with progress bars and image previews.
Dropzone.js is a JavaScript library that provides an easy way to upload and preview images with a nice progress bar. It supports multiple file uploads and drag and drop uploads. It provides features such as image previews, upload progress bars, multiple files and synchronous uploads.
Let's see how to use Dropzone.js step by step with Laravel 8 to implement multiple file and image upload with progress bars and image previews.
Step 1 — Initializing a Laravel 8 App
Let's get started by creating a new Laravel 8 application.
Head over to a new command-line interface and run the following command:
$ composer create-project --prefer-dist laravel/laravel laravel8uploadapp
Step 2 — Setting up a MySQL Database
After creating our Laravel 8 application using Composer, let's proceed to set up a database.
Open the .env file and add the credentials for accessing your database:
DB_CONNECTION=mysql
DB_HOST=127.0.0.1
DB_PORT=3306
DB_DATABASE=mydb
DB_USERNAME=root
DB_PASSWORD=root
In my case, I have already created a database named mydb in MySQL server, also make sure to change the username and password to the ones configured for your MySQL instance,
Step 3 — Adding a Laravel 8 Controller
Next, after configuring the MySQL database in your Laravel 8 application, let's add a controller for uploading files to our server.
Head back to your terminal and run the following command:
$ php artisan make:controller UploadController
Open the app/Http/Controllers/UploadController.php file and update it as follows:
<?php

namespace  App\Http\Controllers;
use  Illuminate\Http\Request;

class  UploadController  extends  Controller {

/**
 * Generate Upload View
 *
 * @return void

 */

  public  function upload()
  {
      return view('upload-view');
  }

/**
 * File Upload Method
 *
 * @return void
 */

  public  function uploadFile(Request $request)
  {
     $file = $request->file('file');
     $fileName = time().'.'.$file->extension();
     $file->move(public_path('file'),$fileName);

  return response()->json(['success'=>$fileName]);

  }

}
Step 4 — Adding a Laravel 8 Route
Next, let's proceed to add a route for uploading files to our server.
Head to the routes/web.php file and add following route:
use App\Http\Controllers\UploadController;

Route::get('ui', [ UploadController::class, 'upload' ]);
Route::post('upload', [ UploadController::class, 'uploadFile' ])->name('uploadFile');
Step 5 — Adding a Blade View
Finally, let's add a view template using Blade. We'll use Dropzone.js for uploading files.
The typical way of using dropzone is by creating a form element with the class dropzone:
Create the the upload-view.blade.php file inside the resources/views/folder.
Next, open the resources/views/upload-view.blade.php and update it as follows:
<!DOCTYPE html>
<html>
<head>
<title>Laravel 8 Drag And Drop File Upload </title>
<link href="https://cdnjs.cloudflare.com/ajax/libs/dropzone/4.3.0/dropzone.css" rel="stylesheet">
<script src="https://cdnjs.cloudflare.com/ajax/libs/dropzone/4.3.0/dropzone.js"></script>
<script>
var dropzone = new Dropzone('#demo-upload', {
previewTemplate: document.querySelector('#preview-template').innerHTML,
parallelUploads: 2,
thumbnailHeight: 120,
thumbnailWidth: 120,
maxFilesize: 3,
filesizeBase: 1000,
thumbnail: function(file, dataUrl) {
if (file.previewElement) {
file.previewElement.classList.remove("dz-file-preview");
var images = file.previewElement.querySelectorAll("[data-dz-thumbnail]");
for (var i = 0; i < images.length; i++) {
var thumbnailElement = images[i];
thumbnailElement.alt = file.name;
thumbnailElement.src = dataUrl;
}
setTimeout(function() { file.previewElement.classList.add("dz-image-preview"); }, 1);
}
}
});
// Now fake the file upload, since GitHub does not handle file uploads
// and returns a 404
var minSteps = 6,
maxSteps = 60,
timeBetweenSteps = 100,
bytesPerStep = 100000;
dropzone.uploadFiles = function(files) {
var self = this;
for (var i = 0; i < files.length; i++) {
var file = files[i];
totalSteps = Math.round(Math.min(maxSteps, Math.max(minSteps, file.size / bytesPerStep)));
for (var step = 0; step < totalSteps; step++) {
var duration = timeBetweenSteps * (step + 1);
setTimeout(function(file, totalSteps, step) {
return function() {
file.upload = {
progress: 100 * (step + 1) / totalSteps,
total: file.size,
bytesSent: (step + 1) * file.size / totalSteps
};
self.emit('uploadprogress', file, file.upload.progress, file.upload.bytesSent);
if (file.upload.progress == 100) {
file.status = Dropzone.SUCCESS;
self.emit("success", file, 'success', null);
self.emit("complete", file);
self.processQueue();
//document.getElementsByClassName("dz-success-mark").style.opacity = "1";
}
};
}(file, totalSteps, step), duration);
}
}
}
</script>
<style type="text/css">
body {
background: rgb(243, 244, 245);
height: 100%;
color: rgb(100, 108, 127);
line-height: 1.4rem;
font-family: Roboto, "Open Sans", sans-serif;
font-size: 20px;
font-weight: 300;
text-rendering: optimizeLegibility;
}
h1 { text-align: center; }
.dropzone {
background: white;
border-radius: 5px;
border: 2px dashed rgb(0, 135, 247);
border-image: none;
max-width: 500px;
margin-left: auto;
margin-right: auto;
}
</style>
</head>
<body>
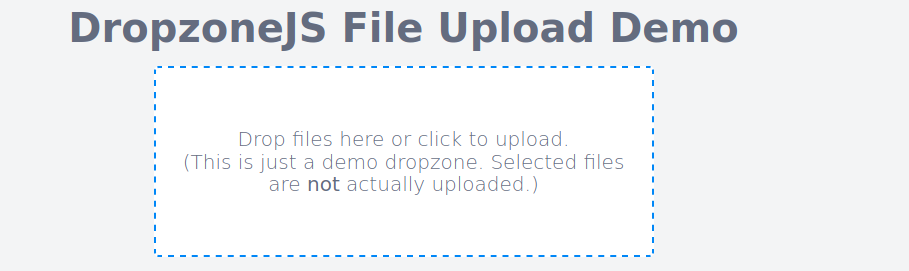
<h1>Laravel 8 DropzoneJS File Upload Demo</h1>
<section>
<div id="dropzone">
<form class="dropzone needsclick" id="demo-upload" action="" enctype="multipart/form-data">
@csrf
<div class="dz-message needsclick">
Drop files here or click to upload.<br>
<span class="note needsclick">(This is just a demo dropzone. Selected
files are <strong>not</strong> actually uploaded.)</span>
</div>
</form>
</div>
</section>
</body>
</html>
The code for implementing Dropzone.js is taken from this code pen:
That’s it. Dropzone will find all form elements with the class dropzone, automatically attach itself to it, and upload files dropped into it to the specified action attribute.
We have implemented our Laravel 8 file upload using Dropzone.js to drag, drop and upload single or multiple images or files with progress bars and image previews.
Step 6 — Running the Laravel 8 Server
You can run your app using the following command:
$ php artisan serve
Head over to your web browser and navigate to the
localhost:8000/uploadui address.
Conclusion
In this short article, we've seen how we can create a Laravel 8 upload UI with Dropzone.js to implement a drag, drop UI for uploading single or multiple files and images with progress bars and image previews
-
Date:

Think Python

Python for Data Analysis

Automate the Boring Stuff with Python

Small Python Projects

Learn More Python 3 the Hard Way

The Quick Python Book

Python Beyond the Basics

Clean Code in Python
Awesome Vibe Coding
A curated list of vibe coding assistants, IDEs, tools and references for learning how to efficently collaborate with AI to write code. Best practices of prompt enginnering for developers. AI-powered tools for coding and UX/UI design. Our focus is on tools that allow for generating code or designs using natural language prompts.
