Angular 9/8 Reactive Forms with Validation Tutorial by Example
Reactive forms are one approach (alongside with the template-driven approach) of working with forms in Angular 9.
In this tutorial, we'll build a login form example with validation using the reactive or the model-driven approach.
Latest from angular
Bookmark This Article
Your browser doesn't support automatic bookmarking. You can:
- Press Ctrl+D (or Command+D on Mac) to bookmark this page
- Or drag this link to your bookmarks bar:
Clicking this bookmarklet when on any page of our site will bookmark the current page.
Prerequisites for Working with Reactive Forms in Angular 9
You need to have Node.js and npm installed on your system.
You also need Angular CLI 9 installed otherwise, you can simply run the npm install -g @angular/cli command to install it.
Generating a New Angular 9 Project
Let's start our tutorial by generating a project from scratch. You can skip this part if you already have a project.
Open a new terminal and run this command:
$ ng new angular-login-demo
You will be asked if Would you like to add Angular routing? Enter y and Which stylesheet format would you like to use? Choose CSS.
The CLI will generate the necessary source and configuration files and install the npm dependencies. You'll also have routing setup without further intervention from you. You only need to add your components in the routes array in the src/app/app-routing.module.ts file which is the root routing module of our application.
Generating Components, Interface, Service and Router Guard
Let's now generate the different artifacts needed in our project. We'll need a couple of components, a service, an interface and a Router guard.
Head back to your terminal and navigate in the root folder of your project:
$ cd angular-login-demo
Generating Login and Admin Components
Next, use the ng generate command to generate the components:
$ ng g c login
$ ng g c admin
We generate two LoginComponent and AdminComponent components.
The login component will contain a model-driven (reactive) form for submitting the user's email and password.
The admin component will be protected from public access. Only logged in users will be able to access it and will contain a logout button permitting the user to log out.
You need to add these components to the routing module. Open the src/app/app-routing.module.ts file and the following changes:
import { NgModule } from '@angular/core';
import { Routes, RouterModule } from '@angular/router';

import { LoginComponent } from './login/login.component';
import { AdminComponent } from './admin/admin.component';

const routes: Routes = [
  { path: '', pathMatch: 'full', redirectTo: 'login'},
  { path: 'login', component: LoginComponent },
  { path: 'admin', component: AdminComponent }
];

@NgModule({
  imports: [RouterModule.forRoot(routes)],
  exports: [RouterModule]
})
export class AppRoutingModule { }
We add three routes, one for redirecting the empty path to the login path, the login path and the admin path. Now, when you visit the http://127.0.0.1:4200/ address you'll be redirected to http://127.0.0.1:4200/login.
If you serve your application at this point, you'll get the following page:
Let's remove this default HTML code. Open the src/app/app.component.html file and remove everything but leave <router-outlet>:
<router-outlet></router-outlet>
Generating the User Model/Interface
We'll be working with a user model so we need to generate a User interface. In your terminal, run the following command:
$ ng g interface user
Open the src/app/user.ts file and update it accordingly:
export  interface  User {
    email: string;
    password: string;
}
Our model is comprised of an email and password.
Generating an Angular Authentication Service
Let's now create an Angular service that encapsulates the methods that we'll be calling in our components to enable users to login and logout. In your terminal:
$ ng g service auth
Open the src/app/auth.service.ts file and update it accordingly:
import { Injectable } from '@angular/core';
import { User } from './user';

@Injectable({
  providedIn: 'root'
})
export class AuthService {

  constructor() { }

  public login(userInfo: User){
    localStorage.setItem('ACCESS_TOKEN', "access_token");
  }

  public isLoggedIn(){
    return localStorage.getItem('ACCESS_TOKEN') !== null;

  }

  public logout(){
    localStorage.removeItem('ACCESS_TOKEN');
  }
}
This is a incomplete authentication service. For a real world and complete implementation, check out Angular 7/8 Tutorial: Using Angular HttpClient with Node & Express.js - Example POST Requests.
Creating a Router Guard
Let's now create a Router guard that will be used for securing the admin component. In your terminal, run this command:
$ ng generate guard auth
Open the src/app/auth.guard.ts file and update it accordingly:
import { Injectable } from '@angular/core';
import { CanActivate, ActivatedRouteSnapshot, RouterStateSnapshot } from '@angular/router';
import { Observable } from 'rxjs';
import { AuthService } from './auth.service';

@Injectable({
  providedIn: 'root'
})
export class AuthGuard implements CanActivate {
  constructor(private authService: AuthService){}
  canActivate(
    next: ActivatedRouteSnapshot,
    state: RouterStateSnapshot): Observable<boolean> | Promise<boolean> | boolean {

      return this.authService.isLoggedIn();

  }
}
We import AuthService and inject it via the class constructor then in the canActivate() method, we call and return the isLoggedIn() method.
The canActivate() method returns true if the isLoggedIn() methods returns true i.e if the user is logged in.
If the canActivate() method returns true the route which has this guard applied can be accessed by the user.
Next, you need to apply this guard to the route you want to protect. Open the src/app/app-routing.module.ts file and update it accordingly:
import { NgModule } from '@angular/core';
import { Routes, RouterModule } from '@angular/router';

import { LoginComponent } from './login/login.component';
import { AdminComponent } from './admin/admin.component';
import { AuthGuard } from './auth.guard';


const routes: Routes = [
  { path: '', pathMatch: 'full', redirectTo: 'login'},
  { path: 'login', component: LoginComponent },
  { path: 'admin', component: AdminComponent, canActivate: [AuthGuard] }
];

@NgModule({
  imports: [RouterModule.forRoot(routes)],
  exports: [RouterModule]
})
export class AppRoutingModule { }
We use the canActivate array of the admin route to apply AuthGuard to the route which protects it from users that are not logged in.
Creating the Login Form using Angular 9 Reactive Forms
Before using reactive forms in Angular 9 we need to import FormsModule and ReactiveFormsModule in the application module.
Open the src/app/app.module.ts file and update it accordingly:
import { BrowserModule } from '@angular/platform-browser';
import { NgModule } from '@angular/core';
import { FormsModule, ReactiveFormsModule} from '@angular/forms';

import { AppRoutingModule } from './app-routing.module';
import { AppComponent } from './app.component';
import { LoginComponent } from './login/login.component';
import { AdminComponent } from './admin/admin.component';

@NgModule({
  declarations: [
    AppComponent,
    LoginComponent,
    AdminComponent
  ],
  imports: [
    BrowserModule,
    FormsModule,
    ReactiveFormsModule,
    AppRoutingModule
  ],
  providers: [],
  bootstrap: [AppComponent]
})
export class AppModule { }
We can now use reactive forms in our application!
Open the src/app/login.component.ts file and import:
-
FormBuilder,FormGroup,Validatorssymbols that are used to create Angular reactive forms, -
Routerfor routing, AuthServiceand theUsermodel.
import { FormBuilder, FormGroup, Validators } from  '@angular/forms';
import { Router } from  '@angular/router';
import { User } from  '../user';
import { AuthService } from  '../auth.service';
Next, inject the FormBuilder, Router and AuthService via the service constructor:
export class LoginComponent implements OnInit {

  constructor(private authService: AuthService, private router: Router, private formBuilder: FormBuilder ) { }

  ngOnInit() {
  }
}
Next, add these service variables:
  loginForm: FormGroup;
  isSubmitted  =  false;
Next, in the ngOnInit() life-cycle event, create the form:
ngOnInit() {
    this.loginForm  =  this.formBuilder.group({
        email: ['', Validators.required],
        password: ['', Validators.required]
    });
}
Next, add a get property to make easy to access the form controls on the HTML form:
get formControls() { return this.loginForm.controls; }
Finally, add the login() method:
  login(){
    console.log(this.loginForm.value);
    this.isSubmitted = true;
    if(this.loginForm.invalid){
      return;
    }
    this.authService.login(this.loginForm.value);
    this.router.navigateByUrl('/admin');
  }
Let's now create the HTML form. Open the src/app/login.component.html file and the following content:
<h1 style="text-align:center">
  Angular 9 Login Example
</h1>
<div class="login">
  <h2 class="login-header">Log in</h2>
  <form [formGroup]="loginForm" class="login-container" (ngSubmit)="login()">

    <p [ngClass]="{ 'has-error': isSubmitted && formControls.email.errors }">
      <input type="email" placeholder="Email" formControlName="email">
    </p>

    <div *ngIf="isSubmitted && formControls.email.errors" class="help-block">
      <div *ngIf="formControls.email.errors.required">Email is required</div>
    </div>

    <p [ngClass]="{ 'has-error': isSubmitted && formControls.password.errors }">
      <input type="password" placeholder="Password" formControlName="password">
    </p>

    <div *ngIf="isSubmitted && formControls.password.errors" class="help-block">
      <div *ngIf="formControls.password.errors.required">Password is required</div>
    </div>

    <p>
      <input type="submit" value="Log in">
    </p>
  </form>
</div>
For styling the form we'll be using this codepen example.
Open the src/styles.css and add:
@import  url(https://fonts.googleapis.com/css?family=Open+Sans:400,700);
body {
    background: #456;
    font-family: 'Open Sans', sans-serif;
}
Next, open the src/app/login.component.css file and these styles:
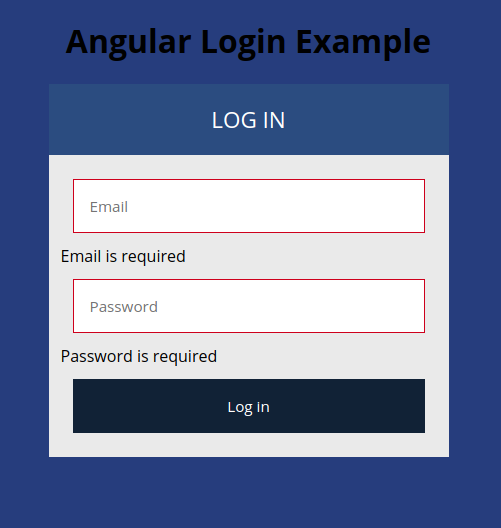
This is the screenshot of our reactive login form:

Also, add this CSS style for error class:
.has-error input[type="email"],
.has-error input[type="password"] {
    border-color: rgb(216, 12, 12);
    color: rgb(230, 14, 14);
}
This is a screenshot of the form when not valid:
Implementing the Admin Component
Open the src/app/admin.component.ts file and add:
import { Component, OnInit } from '@angular/core';
import { Router } from '@angular/router';
import { AuthService } from '../auth.service';

@Component({
  selector: 'app-admin',
  templateUrl: './admin.component.html',
  styleUrls: ['./admin.component.css']
})
export class AdminComponent implements OnInit {

  constructor(private authService: AuthService, private router: Router) { }

  ngOnInit() {
  }

  logout(){
    this.authService.logout();
    this.router.navigateByUrl('/login');
  }

}
Next, open the src/app/admin.component.html file and add:
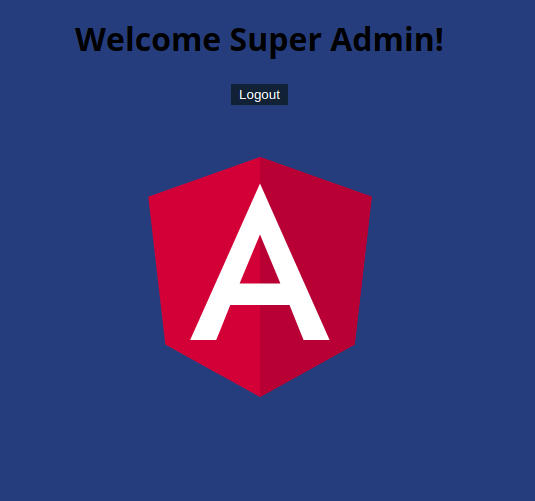
<div style="text-align:center">
  <h1>
    Welcome Super Admin!
  </h1>
  <p>
    <button (click)="logout()">
      Logout
    </button>
  </p>
  <img width="300" alt="Angular Logo" src="data:image/svg+xml;base64,PHN2ZyB4bWxucz0iaHR0cDovL3d3dy53My5vcmcvMjAwMC9zdmciIHZpZXdCb3g9IjAgMCAyNTAgMjUwIj4KICAgIDxwYXRoIGZpbGw9IiNERDAwMzEiIGQ9Ik0xMjUgMzBMMzEuOSA2My4ybDE0LjIgMTIzLjFMMTI1IDIzMGw3OC45LTQzLjcgMTQuMi0xMjMuMXoiIC8+CiAgICA8cGF0aCBmaWxsPSIjQzMwMDJGIiBkPSJNMTI1IDMwdjIyLjItLjFWMjMwbDc4LjktNDMuNyAxNC4yLTEyMy4xTDEyNSAzMHoiIC8+CiAgICA8cGF0aCAgZmlsbD0iI0ZGRkZGRiIgZD0iTTEyNSA1Mi4xTDY2LjggMTgyLjZoMjEuN2wxMS43LTI5LjJoNDkuNGwxMS43IDI5LjJIMTgzTDEyNSA1Mi4xem0xNyA4My4zaC0zNGwxNy00MC45IDE3IDQwLjl6IiAvPgogIDwvc3ZnPg==">
</div>
Finally, open the src/app/admin.component.css file and add:
button{
    background: rgb(1, 29, 51);
    border-color: transparent;
    color: #fff;
    cursor: pointer;
}
This is the screenshot of our admin page:
You can log out from the admin page and you will be redirected to the login form.
Conclusion
We reached the end of this tutorial in which we have created a login from with Angular 9 reactive forms. We've also seen how to do form validation.


