Laravel 6/7 Tutorial & New Features - Creating and Migrating a MySQL Database

Laravel 7 is the latest version of the most popular PHP framework for web development. It comes with a bunch of a new features and enhancements.
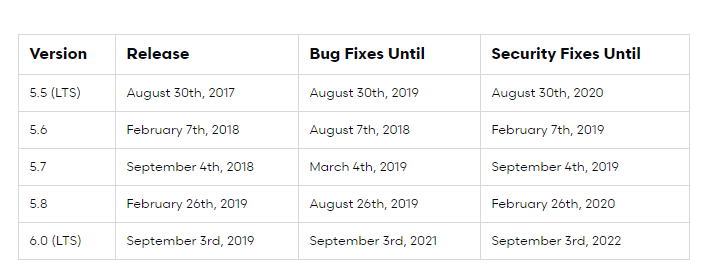
Note: Laravel 6 is the current LTS (Long Time Support) version instead of Laravel 5.5.
Laravel 6 is released on the date of September 3rd, 2019 whereas Laravel 7 is released on March 3rd, 2020.
For v5.5, bug fixes will end on August 30th, 2019 but security updates will be made until August 30th, 2020.
This is a table from the official docs that displays the release dates and other important dates for the various versions of Laravel:
Laravel 6/7 Tutorial Summary
In this tutorial, we'll see the new features of Laravel 6, we'll learn how to generate a Laravel 6 project using Composer and how to build a CRM web application from scratch. We'll see how to configure a MySQL database for our app, create models, migrate our database and create controllers for exposing a REST API that will then be consumed from a Vue.js interface.
You'll also learn about the basic concepts of Laravel such as routing, controllers, models and views, etc.
The New Features of Laravel 6/7
So, what is new with Laravel 6 and 7?
As mentionned, Laravel 6 comes with a bunch of new features and enhancements such as:
- The support of Semantic Versioning,
- Compatibility with Vapor, a serverless deployment platform for Laravel,
- Improved Authorization Responses,
- Job Middleware: A new feature that allows you wrap custom logic around the execution of queued jobs,
- Lazy Collections: A new feature that leverages PHP's generators to enable you to efficently work with very large datasets,
- Eloquent Subquery Enhancements,
- Laravel UI: UI scaffolding logic such as Bootstrap or Vue, is extracted in its own
laravel/uipackage. - Ignition: A new and smart error page.
Check out the docs for more details.
For Laravel 7:
- Laravel Airlock: An official package for API authentication,
- Custom Eloquent Casts: They allow you add your won custom casts,
- CORS support by default i.e without third-party plugins,
- Blade Component Tags & Improvements: Allows you to create class-less components,
- HTTP Client: An API for making HTTP requests,
- Route Caching Speed Improvements, etc.
Laravel 6/7 Basic Concepts
If this is your first time working with Laravel, let's get started by learning about the basic Laravel concepts. In fact, these concepts are common between most web development frameworks so if you are famiiar with other frameworks you shoud be able to easily grasp them:
- Routing
- Models, controllers and views
- Blade templating
- Requests and responses
- Database migrations
- Middlewares
- Eloquent ORM
Laravel 6/7 Routing
Routing is an important feature in any web application and allows your app to route HTTP requests to the appropriate handler whcih sends an appropriate response be it an HTML view or a JSON response.
In Laravel, routing is builtin in the core of the framework and provides a flexible and powerful API for developers to make it easy to create routes and map them to their handlers.
It simpy works by maping HTTP verbs such as GET and POST to functions that execute the approriate actions when requests are received.
For example, you can use a GET request to retrieve a resource from the server when the coreesonding route is visited or a POST request to submit a form.
You can create routes in the routes folder of your project in one of the avaiabe files:
api.php: API Routeschannels.php: Broadcast Channelsconsole.php: Console Routesweb.php: Web routes
This is an example route:
Route::get('/', function () {
    return view('welcome');
});
Laravel 6/7 Controllers
A Laravel controller reresents the C part in the MVC architecture which is reponsible for orchistering the oerations between the View and Model and passing information from the model to the view for rendering it.
You can use the following command to generate a controller:
$ php artisan controller:make [Name]Controller
Laravel 6/7 Views
A Laravel view represents the V part of the MVC architecture. They are simply HTML pages (with CSS and JavaScript) composing the UI of the application that are sent to the client once they are processed and rendered. Views are merely presentationel i.e they don't contain business logic .
Blade templating
Laravel makes use a templating language called Blade which is powerful and easy to use. They support modern features like inheritance which enables the reuse of templates.
You can create templates in the resources/views folder of your project using the blade.php extension.
According to the official docs :
Blade is the simple, yet powerful templating engine provided with Laravel. Unlike other popular PHP templating engines, Blade does not restrict you from using plain PHP code in your views. In fact, all Blade views are compiled into plain PHP code and cached until they are modified, meaning Blade adds essentially zero overhead to your application. Blade view files use the
.blade.phpfile extension and are typically stored in theresources/viewsdirectory.
Check out the docs for all the features of Blade.
Request and responses
Traditionnal frameworks like Laravel works based on HTTP request and response cycles. Requests are sent from clients using HTTP verbs like GET, POST, DELETE and UPDATE. When they are processed by Laravel, appropriate responses are created and sent back to clients.
The request object can have various information like user input.
A response is created and sent from the controller mapped to the route which received the request.
Laravel 6/7 Models and Migrations
In Laravel, the Model from the MVC pattern represents the part that contains the business/domain logic. It corresnponds to a table in the database and allow you to interact with the database with high level APIs.
Migrations allow you to create the intial database tables and their fields and then track any changes made to the database schema during the development or even in production and apply them without the need of dropping and recreating the database each time.
Migrations can be important in production more than development since in most cases , you can drop a database without any problem when you are still developing your application but you can's drop a production database with users data if you need to change your database schema at the future. In this case, migrations can help you to easily evolve the structure of your database while keeping the old data.
Laravel middlewares
Middlewares are pieces of code that are executed before some specific HTTP requests before running the correspong controllers.
Laravel includes several builtin middlewares for authentication and CSRF protection but you can also create your custom middlewares when needed.
Laravel Eloquent ORM
Laravel makes use of an ORM which stands for Object Relationnal Mapper and implements the PHP Active Record Pattern. This allows you to work with databases without actually dealing with SQL and the differences between database systems.
The Laravel ORM is called Eloquent ORM and is a very powerful and easy to use ORM, which allows you to interact with the underlying database tables and define relationships between them using a clear and concise syntax.
In Laravel, each database table is mapped to its corresponding Eloquent model which contains various methods for accessing and updating the data in the table.
What is Laravel?
Laravel is web development framework for building web applications with PHP. It's created and maintained by Taylor Otwell. It's based on modern and powerful design patterns like MVC, dependeny injection and ORMs.
Since v1 which was released in June 2011, the framework has been groing since then to become one of the most powerful and popular framework in the PHP community. It's now in version 7.
How Does Laravel Framework Work?
Laravel works by providing a set of abtractions on top of PHP and Symfony that make it easy to listen for requests and send the right responses either JSON data in the case of REST or a rendered HTML document in a tradiotional web application. It also provides a powerful ORM which abtracts away all the complexities of dealing with SQL databases ease database migrations.
A framework provides developers with a set of APIs and patterns for solving common web development problems encoutered by web developers. Laravel follows an MVC architecture.
MVC stands for Model View Controller and its an architectural design pattern that enables the sepration of concerns. This is its definition from Wikipedia:
Model–View–Controller (usually known as MVC) is a software design pattern commonly used for developing user interfaces which divides the related program logic into three interconnected elements. This is done to separate internal representations of information from the ways information is presented to and accepted from the user. Following the MVC design pattern decouples these major components allowing for code reuse and parallel development.
Now that we have the basic concepts of the framework, let's see the prerequisites required for working with our Laravel 6 tutorial.
Prerequisites
You'll need to have a few prerequisites to be able to successfully complete this tutorial:
- Familiarity with PHP 7,
- Composer (A PHP dependency management for PHP) installed on your machine. You can head to the official website for instructions how to download install it.
- MySQL installed on your system,
- PHP >= 7.2.0 installed on your system with the following extensions:
- - PHP >= 7.2.0
- - BCMath PHP Extension
- - Ctype PHP Extension
- JSON PHP Extension
- - Mbstring PHP Extension
- - OpenSSL PHP Extension
- - PDO PHP Extension
- - Tokenizer PHP Extension
- - XML PHP Extension
If you have these prerequisites, let's get started by creating our first web project with Laravel 6.
Creating a New Laravel 7 Project
You can create a new Laravel 6 project using the following command from your terminal:
$ composer create-project --prefer-dist laravel/laravel crmapp
Configuring the MySQL Database
We'll be using MySQL, the most popular database system used by PHP and Laravel developers so make sure you have created a database for your project. You can simply use the mysql client. Open a new terminal window and run the following command:
$ mysql -u root -p
You will get prompted for a password. Enter the one you submitted when you configured your MySQL installation and hit Enter.
When the mysql clients starts, enter the following SQL instruction to create a database:
mysql> create database l6db;
Note: You can also use phpMyAdmin to create and work with MySQL databases. phpMyAdmin is a free web interface tool created in PHP, intended to handle the administration of MySQL over the Web. It's beginners friendlier tool that's commonly used by PHP developers.
Now, let's let Laravel know about our created database. Open the .env file in the root of your project and update the MySQL credentials with your own values:
DB_CONNECTION=mysql
DB_HOST=127.0.0.1
DB_PORT=3306
DB_DATABASE=l6db
DB_USERNAME=root
DB_PASSWORD=<YOUR_DATABASE_PASSWORD>
Please note that you need to provide the correct username and password for a valid MySQL user in your system and also the correct name of a created database.
This will allow your application to connect to your MySQL database.
You can also configure the database connection in the config/database.php.
The database configuration for your application is located at
config/database.php. In this file you may define all of your database connections, as well as specify which connection should be used by default. Examples for most of the supported database systems are provided in this file. The official docs
Next, let's create the database tables using the following command:
$ php artisan migrate
Note: Until now, we didn't create any models but Laravel makes use of multiple tables so we need to run the previous command to create them in our database. After we create our own models, we can run the
artisan migratecommand again to update the database structure.
This is the output of the command:
Migrating the database
After setting up your MySQL database crendentails, you will need to create some tables required by Laravel by running the migrate command:
$ php artisan migrate
The migrate command will apply a few necessary builtin migrations that will create the tables for users, password resets and failed jobs. These tables are required for the inner working of Laravel.
This is the output of this migrate command:
Migration table created successfully.
Migrating: 2014_10_12_000000_create_users_table
Migrated:  2014_10_12_000000_create_users_table (0.39 seconds)
Migrating: 2014_10_12_100000_create_password_resets_table
Migrated:  2014_10_12_100000_create_password_resets_table (0.33 secon
Migrating: 2019_08_19_000000_create_failed_jobs_table
Migrated:  2019_08_19_000000_create_failed_jobs_table (0.23 seconds)
At this point of our Laravel tutorial, if you get Laravel Migration Error: Syntax error or access violation: 1071 Specified key was too long; max key length is 767 bytes
Simply, open the config/database.php file and change charset and collation as follows:
'charset' => 'utf8',
'collation' => 'utf8_unicode_ci',
Running a local PHP development server
Before setting up a fully-fledged server like Apache, you can use the PHP's built-in development server for locally serving your application. In your terminal, run the serve command from the root of your project as follows:
$ php artisan serve
This will start a local development server at http://localhost:8000.
If this command is not properly working, you can call the PHP builtin server directly using the following command:
$ php -S localhost:8000 -t public/
Head back to your web browser and navigate to that address, you should see the following interface:
The Application We'll Be Building
We'll be building a simple CRM application that allows sales managers to manage contacts, accounts, leads, opportunities, tasks and related activities.
For the sake of simplicity we'll try to add few interfaces as we can in our application. The main interface is a dashboard which contains the table of contacts and their status (lead, opportunity and customer). We'll not add login and authentication in this tutorial as we'll be the subject of another tutorial.
In our CRM database we'll be making use of the following tables:
- contacts — contains information about contacts/customers such as name, address, company/account, ,
- activities — contains activities (phone calles, meetings and emails etc.) about the contacts,
- accounts — contains information about contact companies,
- users — contains information about the application users
We'll also be using the following JOIN tables:
- contact_status — contains contact status such as lead, opportunity or customer which indicates the stage in the sales cycle
- activity_status — the activity status can be either pending, ongoing or completed,
- contact_source — contains contact source.
The contacts table has the following fields:
- id
- title,
- first name,
- last name,
- email,
- phone,
- address,
- source_id,
- date of first contact,
- account_id,
- status_id,
- user_id,
The contact_status table has the following fields:
- id,
- status = (lead, proposal, customer, archived)
The contact_source table:
- id,
- name
The accounts table has the following fields:
- id,
- name,
- description
The activities table has the following fields:
- id,
- date,
- description,
- contact_id
- status_id
The activity_status table has the following fields:
- id,
- status
Conclusion
As a wrap-up of the first part of our Laravel 6/7 tutorial, we've introduced Laravel framework, seen the new features of Laravel 6/7, seen the the basic concepts required for beginners, created a project using Composer based on the latest v7 and configured our MySQL database.
We have also seen the requirements of the CRM application we'll be building throughout this tutorial series. If you are ready, let's continue with the second tutorial where we'll create models and migrations for our app.
-
Date:
Buy our ebook: Angular 17 from Scratch - Build an ecommerce app step by step!

Subscribe to our Angular Newsletter and Get 4 Angular eBooks for Free
- Ebook 1: Angular standalone components
- Ebook 2: Learn Angular In 15 Easy Steps
- Ebook 3: Practical Angular: Build 5 Apps From Scratch!
- Ebook 4: Build a Movies App with Angular 18 and Tailwind


