Laravel 7/6 Email Verification Tutorial and Example
In the previous tutorial, we've added login and registration to our Laravel 7/6 example app. Let's now see how to add email verification.
Latest from laravel
Bookmark This Article
Your browser doesn't support automatic bookmarking. You can:
- Press Ctrl+D (or Command+D on Mac) to bookmark this page
- Or drag this link to your bookmarks bar:
Clicking this bookmarklet when on any page of our site will bookmark the current page.
How Email Verification Works in Laravel 7/6?
Typically, after registering a user using an email address, you should see a verification email to verify that the user owns the email address they used for the registration of the account.
Only after successful email verification, the user will be authenticated and redirected to the home page.
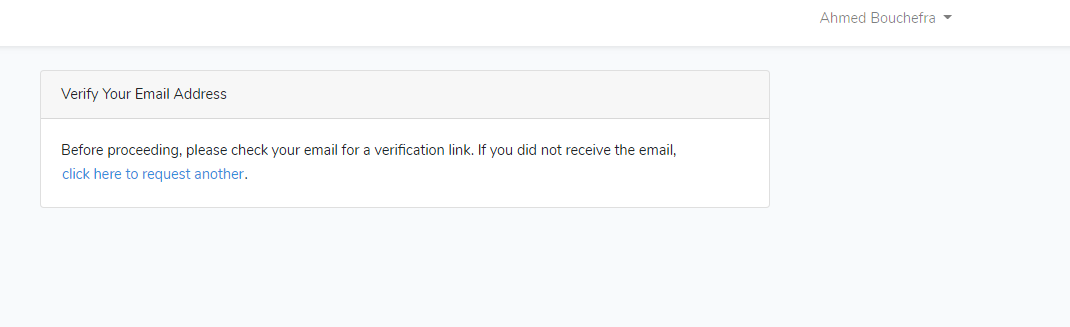
If the user doesn't verify the email address, the app will display the message: “Before proceeding, please check your email for a verification link. If you did not receive the email.” and will disallow access to the home page.
Adding Email Verification to your Laravel 7/6 App
We will make use of the new MustEmailVerify contract available in newer Laravel versions.
Let's implement this functionality in our CRM app.
Creating a Laravel 7/6 Project
In case, you didn't follow from the previous tutorial(s), these are the steps, you need to follow in a nutshell:
- Create a Laravel 7/6 project using the
composer create-project --prefer-dist laravel/laravel <name>command, - Set up your database in the
.envfile, - Install the
laravel/ui packageusing the composer require laravel/ui command, - Create the auth scaffolding using the
php artisan ui vue --auth, - Run the
npm install && npm run devcommand to build the assets of the auth scaffolding such as JS and Bootstrap, - Migrate your database using the
php artisan migratecommand.
Configuring the SMTP Server
If you successfully executed the previous step, particularly the database and the auth scaffolding, you next need to add the SMTP credentials in the .env file.
First, if you don't already have an SMTP server, you can register a free account with mailtrap, a service for email testing in staging and development.
After you register for an account, you'll get your SMTP credentials once your access your inbox. Copy the username and password and add them in the MAIL_USERNAME and MAIL_PASSWORD options
 MAIL_DRIVER=smtp
 MAIL_HOST=smtp.mailtrap.io
 MAIL_PORT=2525
 MAIL_USERNAME=<YOUR_MAILTRAP_USERNAME>
 MAIL_PASSWORD=<YOUR_MAILTRAP_PASSWORD>
 MAIL_ENCRYPTION=tls
Implementing the Laravel MustVerifyEmail Contract
Next, you need to implement the MustVerifyEmail contract in the User model. Open the App/User.php file and update as follows:
<?php

namespace App;

use Illuminate\Notifications\Notifiable;
use Illuminate\Contracts\Auth\MustVerifyEmail;
use Illuminate\Foundation\Auth\User as Authenticatable;

class User extends Authenticatable implements MustVerifyEmail
{
    use Notifiable;


    protected $fillable = [
        'name', 'email', 'password',
    ];


    protected $hidden = [
        'password', 'remember_token',
    ];


    protected $casts = [
        'email_verified_at' => 'datetime',
    ];
}
Adding the Email Verification Routes
Next, open the app/routes/web.php file and add:
Auth::routes(['verify' => true]);
This will add routes like email/verify and email/resend to our application.
Adding the Email Verification Middleware
Next, open the app/Http/Controllers/HomeController.php file and add the verified middleware as follows:
 class HomeController extends Controller
{

    public function __construct()
    {
        $this->middleware('verified');
    }
Please note that we already have the auth middleware added in the home controller but we changed that in the previous tutorial to call it from the route instead. If you don't prefer to make that change, you can add the verified and auth middlewares using an array as follows:
    public function __construct()
    {
        $this->middleware(['auth', 'verified']);
    }
That's it! We have now added email verification in our application. Go ahead and register a new account, you should be redirected to the following page that asks you to verify your email address before proceeding:
Checking if Laravel Email Verification Works
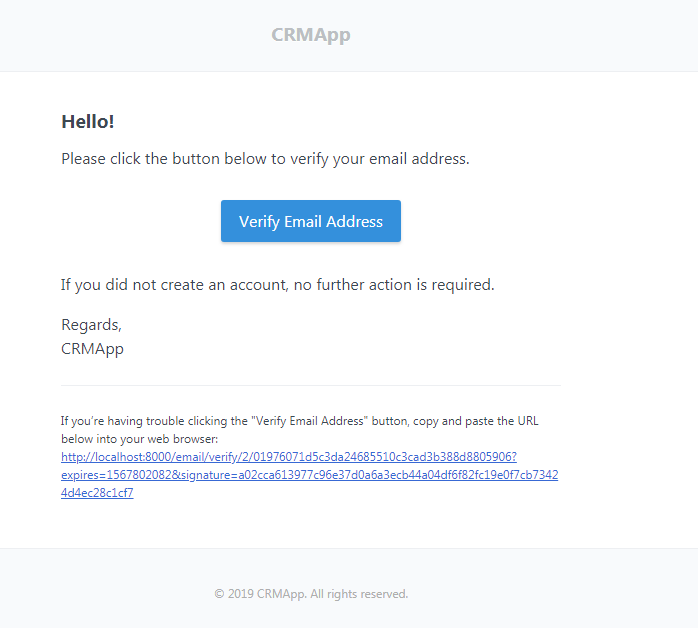
Next, head to your mailtrap inbox, you should find the verification email:
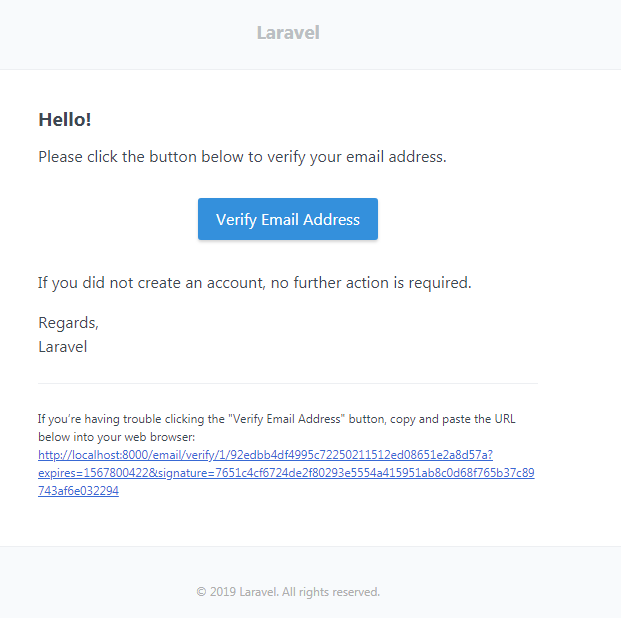
Open it and verify your account. You should be redirected to the home page.
The email template looks professional and doesn't even need any customizations except for the Laravel title. This is simply the name of our application and we can easily change it from the .env file:
APP_NAME=CRMApp
This is a screenshot of the verification email, now:
Conclusion
In this tutorial, we've seen how to add email verification in our Laravel 7/6 application.


