Laravel 7/6 Database Migrations Tutorial with Admin Roles Example
In this tutorial, we'll learn about migrations in Laravel 7/6 including the Schema builder comprised of the Schema and Blueprint facades.
Next, we'll continue building our CRM application by updating the users' table using migrations to add users with different roles (admin and user) in our app.
Latest from laravel
Bookmark This Article
Your browser doesn't support automatic bookmarking. You can:
- Press Ctrl+D (or Command+D on Mac) to bookmark this page
- Or drag this link to your bookmarks bar:
Clicking this bookmarklet when on any page of our site will bookmark the current page.
Laravel 7/6 Migrations by Example
We'll learn:
- How to check if a record/user exists in the database,
- How to create a migration for adding fields to existing database tables
Since our CRM app will be hosted on the web and would be accessed by anyone who has the URL, we need to add some restrictions, so only users that belong to the owner company or organization can register for an account and log in.
Adding User Roles to your Laravel 7/6 App
There are certainly some advanced solutions for this kind of situations, but we can also use simple tricks such as:
Removing the registration link and route, and only allow admins to create accounts for the other users. Updating the login functionality and only allow users to log in after they are approved by admins upon registration.
Let's implement the first option. In this case, we need a way to create the first user which also needs to be the first admin in the application.
We can add a user manually to our database (In fact this will be the task of the final app users by directly creating a user in the database) and make it an admin but we can also implement this in the application by providing a first time registration form that allows a user to create an admin account and stoping showing it if there is at least one admin user in the database.
Note: You can also solve this by providing a configuration interface for our application that gets started when the app is launched for the first time.
How to Provide Users with Admin Role?
Now, how we can mark users as admins? We can do that by simply adding a role field in the users' table that takes either a user or admin values indicating if the user is an admin or not. This simple role system is enough for us at this point of the tutorial but we'll see later how we add an advanced role and permissions system in our app.
After that, users can be created by the admin(s) using a form where we can supply the email and the role of the user. When saved, an email should be sent to users, so they can continue their registration by adding their name and password for their account.
We'll start by adding a role field to the users' table using a migration. But first, let's learn about migrations a little bit.
Introducing Laravel 7/6 Migrations
Migrations are PHP files that contain a class with the up() and down() methods. The up() method is invoked when the migration is applied for adding changes to the database while the down() method is used to revert the applied changes.
Migrations are a powerful tool that enables developers to add changes to existing database tables such as adding or dropping fields without deleting the existing data. This is more important in production than development.
Note: Migrations relieves you from directly dealing with SQL tables and columns via a database management interface.
What you can do with Laravel migrations?
Laravel Migrations allow you to do a kind of version control for your database structure. This helps you easily deploy the next version of your application and revert to previous versions.
They also allow you to change the structure of your database tables by adding, renaming or dropping fields or add complete new tables without losing the existing data.
Laravel Migrations 101
We have previously migrated our database in the first tutorial which applied a set of builtin Laravel migrations for adding some essential tables for the working of the auth system like the users' table. Now, let's see how to create our migrations and apply them.
You can create and apply migrations using Artisan by running the artisan make:migration and artisan migrate commands. Your migration files can be then found in the database/migrations folder. Artisan adds the date and time of when the migration is created as a prefix to the file name.
Note: You need to have configured your database for migrations to work.
By convention, Laravel makes use of the middle name from the name of the migration file as the name of the table in the migration class. But the make:migration command can also be passed the -create and -table parameters for respectively specifying the name of the table in the Schema::create() or Schema::table() methods.
Now, let’s suppose that you made a design error and you want to revert the changes applied with the last "batch" of migrations. You can simply type:
$ php artisan migrate:rollback
You may rollback a specific number of migrations by using the step option with the rollback command. For example, the following command will rollback the lastest migration:
php artisan migrate:rollback --step=1
You can also drop your database and reset all migrations by typing:
$ php artisan migrate:reset
These are the three steps required to create and apply a migration to your database:
- Step 1: Create a migration file using the
php artisan make:migrationcommand. For example, we can create a new users table in the database usingphp artisan make:migration create_users_table --create=users. - Step 2: Define or update the schema of your table by specifying the fields of the new table or add/drop new fields to/from an existing table.
- Step 3: The final step is running the migration using the
php artisan migratecommand.
Note: Migrations can also be seen as version control of our database schema like git for code.
At the code level, a Laravel migration is a class that extends a core Migration class and overrides methods like the up() and down() methods. Anything that you want to add your table schema should be added in the up() method which gets invoked when the migration is applied while you can revert the changes that you made in the up() method in the down() method which gets called when the migration is rolled back.
Laravel provides the Illuminate\Support\Facades\Schema and Illuminate\Database\Schema\Blueprint facades which provide the methods for creating and modifying database tables and fields.
Laravel Schemas
The Laravel Schema class provides a database-agnostic way of working with tables. It supports all of the databases supported by Laravel, and expose a unified API across all types of databases.
You can use the Schema methods for:
- Creating tables using the
Schema::create($name, $closure)method which takes the first argument as the name of the table and a second argument for aClosurewhich receives aBlueprintinstance that you use for defining the schema of the created table. - Renaming tables using the
Schema::rename($from, $to)method. - Dropping tables using the
Schema::drop($name)orSchema::dropIfExists($name)methods. - Updating the schema of an existing table using the
Schema::table($name, $closure)method which takes the name of an existing table as a first argument and aClosure, as a second argument, that receives aBlueprintinstance that can be used to modify the schema of the table.
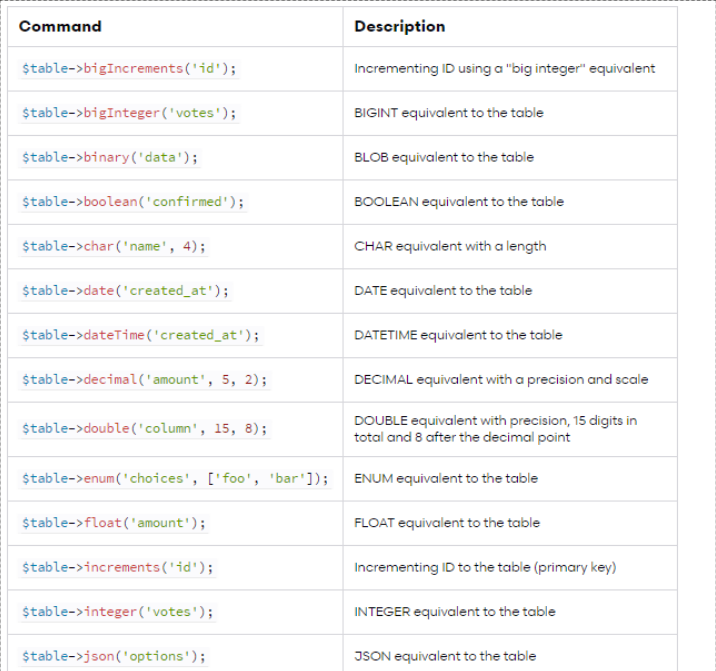
You can use the methods available from the Blueprint object, which is received by the closure passed as a second argument for the Schema:create() and Schema::table() methods, for creating and updating the fields of the database tables. For example:
- You can create a table column, using methods like
string($name)or other methods depending on the type of the column. - You can rename an existing table column using the
renameColumn($from, $to)method, - You can drop an existing table column using the
dropColumn($name)method.
You can refer to the official docs) for a list of the available methods. This is a screenshot of a subset of the methods:
Adding a role field to our users' table
After seeing how migrations work in Laravel, let's now add the role field to the users' table of our database.
Head back to your terminal and generate a new migration file using the following command:
$ php artisan make:migration add_role_field_to_users_table
Created Migration: 2019_09_07_121249_add_role_field_to_users_table
Open the database/migrations/*_*_*_*_add_role_field_to_users_table.php file and update it by adding a role field to the users table:
<?php

use Illuminate\Support\Facades\Schema;
use Illuminate\Database\Schema\Blueprint;
use Illuminate\Database\Migrations\Migration;

class AddRoleFieldToUsersTable extends Migration
{
    /**
     * Run the migrations.
     *
     * @return void
     */
    public function up()
    {
        Schema::table('users', function (Blueprint $table) {
            $table->enum('role', ['user', 'admin'])->default('user');
        });
    }

    /**
     * Reverse the migrations.
     *
     * @return void
     */
    public function down()
    {
        Schema::table('users', function (Blueprint $table) {
            $table->dropColumn('role');
        });
    }
}
You can see that we have a class that extends the builtin Laravel Migration class available from Illuminate\Database\Migrations\Migration. The class defines the up() and down() methods which make the call to the Schema:table() method.
In the up() method, we added the required code for adding the role field to the users' table by calling the Schema::table() to get a Blueprint instance of the table and then calling the enum() method for adding an ENUM column. This code will be executed when we apply the migration.
In the down() method, we get a Blueprint instance of the users' table and we call the dropColumn() method to delete the role column if we decided to roll back the migration.
Note: Laravel uses the middle name of the migration file for the table that we need to create or modify.
Next, drop and migrate your database using the following command:
$ php artisan migrate:fresh
Dropped all tables successfully.
Migration table created successfully.
Migrating: 2014_10_12_000000_create_users_table
Migrated:  2014_10_12_000000_create_users_table (0.45 seconds)
Migrating: 2014_10_12_100000_create_password_resets_table
Migrated:  2014_10_12_100000_create_password_resets_table (5.21 seconds)
Migrating: 2019_08_19_000000_create_failed_jobs_table
Migrated:  2019_08_19_000000_create_failed_jobs_table (11.16 seconds)
Migrating: 2019_09_07_121249_add_role_field_to_users_table
Migrated:  2019_09_07_121249_add_role_field_to_users_table (0.71 seconds)
Note: Instead of adding the role field to the users table using a new migration file, we could also add it using the existing createuserstable migration and that would be totally fine in development since we can drop our database and run all migrations from the start but not in production since we would need to roll back to that migration before we apply it again which means we would lose data of the existing users.
Conclusion
In this tutorial, we've learned about Laravel migrations and we've seen how to use them in our Laravel 6/7 CRM application.
We have seen how to use the Schema builder comprised of the Schema and Blueprint facades and the various Artisan commands to create, apply and roll back migrations.


