In this tutorial we'll learn how to build a React application that consumes a third-party REST API using the fetch() API. We'll also use Bootstrap 4 to style the UI.
We'll consume a third-party API available from this link.
We'll also see some basics of React such as:
- The
stateobject to hold the state of the app and thesetState()method to mutate the state. - The
componentDidMount()life-cycle method for running code when the component is mounted in the DOM. - How to embed JavaScript expressions in JSX using curly braces.
- How to render lists of data using the
map()method and JSX and conditionally render DOM elements using the logical&&operator.
React is the most popular UI library for building user interfaces built and used internally by Facebook.
React has many features such as:
- Declarative: React makes it easy to build interactive UIs by creating views for each state in your application, and let React render just the right components when the data changes.
- Component-Based: Build components that have their own state and compose them to build complex UIs.
- Learn Once, Write Anywhere: React can be rendered on the server using Node and can be use to build native mobile apps using React Native.
Prerequisites
You will need the following prerequisites to successfully complete the steps in this tutorial:
- Working experience of JavaScript,
- Basic understanding of REST APIs,
- Node and NPM installed on your machine. React is a client side library but you need Node.js to run the create-react-app utility that can be used to generate React projects and work with them locally. You can very easily install Node and NPM by getting the binaries from your system from the official website. A better way is to use NVM or Node Version Manager to easily install and manage multiple active Node versions.
If you are ready, let's get started!
Installing create-react-app
We'll use the create-react-app utility to generate a React project with best practices and development scripts created by the official team behind React. Open a new terminal and run the following command to install the utility in your system:
$ npm install -g create-react-app
Note: Please note that you may need to add
sudobefore you command in Debian systems and macOS to be able to installnpmpackages globally. You can also just fix your npm permissions to avoid usingsudo. If you installed Node and NPM using NVM, this will be handled automatically for you.At the time of this writing, create-react-app v2.1.8 is installed in our system.
Creating a React Project
After install create-react-app, let's use it to generate our React project. Head back to your terminal and run the following commands:
$ cd ~
$ npx create-react-app react-fetch-rest-api
We navigated to the home folder and issued the npx create-react-app command to create our project.
Note: You can obviously navigate to any folder you choose for your project.
npxis a tool that allows you to run executables from thenode_modulesfolder, you can find more details from the official website.
Wait for the installation process to finish. This may take a while!
Next, navigate to your project's root folder and run the development server using the following commands:
$ cd create-react-app react-fetch-rest-api
$ npm start
Your local development server will be running from the http://localhost:3000 address and you web browser will be opened automatically and navigated to your React application.
Since we use a live-reload dev server, you can leave the current terminal window open and start a new one for running the rest of the commands in this tutorial. After any changes, you server will be automatically restarted and your application will be live-reloaded in the browser.
This is a screenshot of our application at this point:
Open the src/App.js file and let's remove the default boilerplate code that we are not using in our example. Simply, change the content with the following:
import React, { Component } from 'react';

class App extends Component {
  render() {
    return (
      // Your JSX code goes here.
    );
  }
}

export default App;
Styling the UI with Bootstrap 4
We'll use Bootstrap 4 for styling the UI. Integrating Bootstrap 4 with React is quite easy. Open the public/index.html file and add the following code:
  <head>
    <link rel="stylesheet" href="https://stackpath.bootstrapcdn.com/bootstrap/4.1.3/css/bootstrap.min.css" integrity="sha384-MCw98/SFnGE8fJT3GXwEOngsV7Zt27NXFoaoApmYm81iuXoPkFOJwJ8ERdknLPMO" crossorigin="anonymous">
    <!-- [...] -->
Now, let's display an example todo just for making sure Bootstrap is successfully added. Open the src/App.js and replacte with following code:
import React, { Component } from 'react';

class App extends Component {
  render() {
    return (
       <div className="container">
        <div className="col-xs-12">
        <h1>My Todos</h1>
          <div className="card">
            <div className="card-body">
              <h5 className="card-title">Example Todo</h5>
              <h6 className="card-subtitle mb-2 text-muted">Completed</h6>
            </div>
          </div>
        </div>
       </div>
    );
  }
}
export default App;
In React we use className instead of class for adding a CSS class to DOM elements.
This is a screenshot of the UI:

Fetching and Displaying the REST API
As we said earlier we are going to use the browser fetch API to consume JSON data from the todos API endpoint. First, in the src/App.js file and add a state object to hold our todos once we fetch them:
import React, { Component } from 'react';

class App extends Component {
  state = {
    todos: []
  }
  // [...]
}

export default App;
We created a state variable called todos.
Next, add a componentDidMount() life-cycle method in our src/App.js file and add the code to fetch the JSON data inside it. This method is executed when the component is mounted in the DOM so it's the right place to place our JSON fetching logic:
import React, { Component } from 'react';

class App extends Component {
  state = {
    todos: []
  }
  componentDidMount() {
    fetch('http://jsonplaceholder.typicode.com/todos')
    .then(res => res.json())
    .then((data) => {
      this.setState({ todos: data })
      console.log(this.state.todos)
    })
    .catch(console.log)
  }
  // [...]
}
export default App;
We simply send a GET request to the /todos endpoint. Once the returned Promise is resolved we use the setState() method to assign the returned data to the todos state variable. If there is an error we simply display it in the console.
Note: You can also fetch data in React using Axios
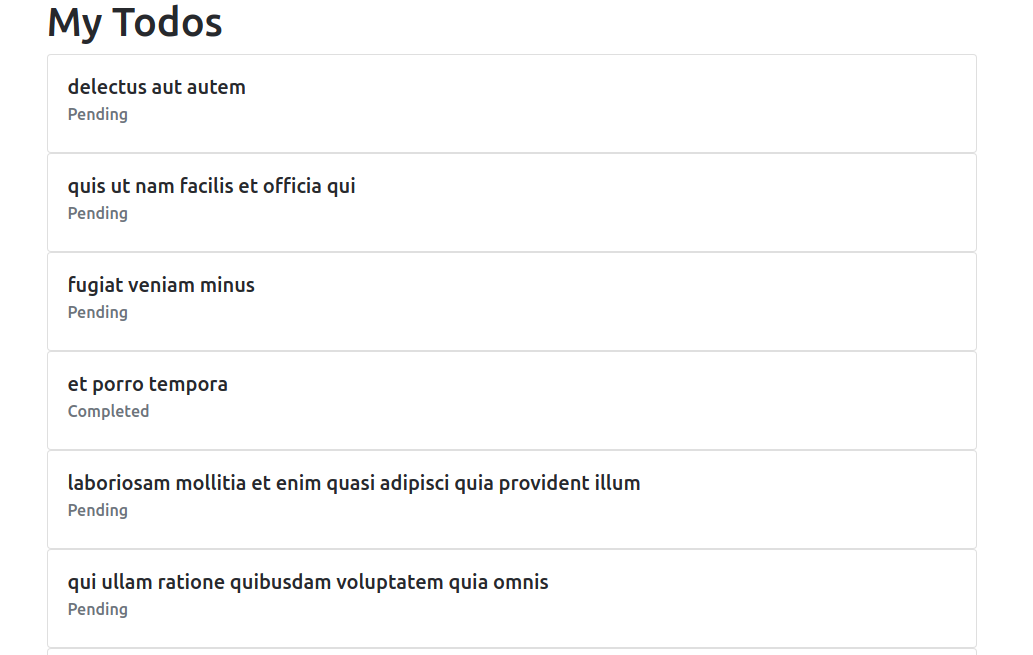
If you open your browser console, you should the fetched todos displayed as an array of objects. Let's render them in our UI. Update the render() method in the src/App.js file as follows:
  render() {

    return (
       <div className="container">
        <div className="col-xs-12">
        <h1>My Todos</h1>
        {this.state.todos.map((todo) => (
          <div className="card">
            <div className="card-body">
              <h5 className="card-title">{todo.title}</h5>
              <h6 className="card-subtitle mb-2 text-muted">
              { todo.completed &&
                <span>
                Completed
                </span>
              }
              { !todo.completed &&
                <span>
                  Pending
                </span>
              }
              </h6>
            </div>
          </div>
        ))}
        </div>
       </div>
    );
  }
In React, you can build lists of elements and include them in JSX using curly braces {}.
In the code, we loop through the state.todos array using the JavaScript map() method and we return a Bootstrap 4 card element for each todo.
We can also embed any expressions in JSX by wrapping them in curly braces.
We used the logical && operator for conditionally including the <span>Completed</span> or <span>Pending</span> elements depending on the value of the completed boolean value of the todo element.
This works because in JavaScript,
true && expressionalways evaluates toexpression, andfalse && expressionalways evaluates tofalse.If the
completedvariable istrue, the element right after&&will appear in the output. If it isfalse, React will ignore and skip it.See: Conditional Rendering.
This will render the todos in the state object.
This is a screenshot of our UI:
Conclusion
That's the end of this tutorial. As a recap:
We have installed the create-react-app and used it to create a React project. Next, we integrated Bootstrap 4 in our React application and used to fetch API to send a GET request to consume JSON data from a third-party REST API in the componendDidMount() life-cycle method.
We also used the state object to hold our fetched JSON data and the setState() method to set the state.
Finally we have seen how to embed JS expressions in JSX and how to render lists of data and conditionally render DOM elements using the logical && operator.