
In this tutorial, we'll learn how to upload files in Angular 10. For the backend we'll be using Nest.JS
We'll see how to use HttpClient to send POST requests with multipart form data used for file uploading. We'll also see how to use reactive forms.
Finally, we'll see how to listen for HttpClient progress events.
Nest.js is a TypeScript framework for building server-side apps inspired by Angular so it's easier to learn by Angular developers since it makes use of the same concepts such as controllers, services and dependency injection etc.
In this tutorial, we'll be implementing the frontend. For the backend, check out:
Nest.js Tutorial: File Uploading with Multer and Serving Static Files in Nest
Setting up The Backend
If you don't follow from the previous tutorial, you simply need to clone the backend project using the following commands:
$ mkdir angular-upload-example
$ cd angular-upload-example
$ git clone https://github.com/techiediaries/nestjs-upload-serve-file.git backend
Next, navigate to the backend project, install the dependencies and run the live development server:
$ cd backend
$ npm install
$ npm run start:dev
You server application will be running from the http://localhost:3000/ address and will expose the following endpoints among others:
/auth/registerfor registering users,/auth/loginfor signing users in,/auth/:userid/avatarfor uploading an image file and set it as the avatar for the identifier user.
Enable CORS
Since we'll be using Angular served from a different port we'll need to enable CORS in our server.
Open the src/main.ts file and call the app.enableCors() method:
import { NestFactory } from '@nestjs/core';
import { AppModule } from './app.module';

async function bootstrap() {
  const app = await NestFactory.create(AppModule);
  app.enableCors();
  await app.listen(3000);
}
bootstrap();
You can now send Cross Origin Request from your Angular 10 app to your Nest.js without any problems. In production, you may want to disable CORS.
Installing Angular CLI 10
Let's start by installing the Angular CLI 10 using the following command:
$ npm install -g @angular/cli@next
Next, let's create the Angular 10 project:
$ cd angular-upload-example
$ ng new frontend
The Angular CLI will ask if Would you like to add Angular routing? Type Yes if you don't want to manually add routing to your project. It will also ask you Which stylesheet format would you like to use? Choose CSS. The CLI will then generate the project's files and install the dependencies from npm.
After generating the directory structure and installing the dependencies, you can start the development server using:
$ cd frontend
$ ng serve
Your Angular 10 application will be running from the http://loclahost:4200 address.
Importing ReactiveFormsModule & HttpClientModule
Let's start by importing the necessary modules in our project: ReactiveFormsModule for handling forms and HttpClientModule for sending HTTP requests.
Open the src/app/app.module.ts file and add the following changes:
import { BrowserModule } from '@angular/platform-browser';
import { NgModule } from '@angular/core';

import { ReactiveFormsModule } from '@angular/forms';
import { HttpClientModule } from '@angular/common/http';

import { AppRoutingModule } from './app-routing.module';
import { AppComponent } from './app.component';


@NgModule({
  declarations: [
    AppComponent
  ],
  imports: [
    BrowserModule,
    ReactiveFormsModule,
    HttpClientModule,
    AppRoutingModule
  ],
  providers: [],
  bootstrap: [AppComponent]
})
export class AppModule { }
We simply import ReactiveFormsModule and HttpClientModule from @angular/forms and @angular/common/http then we include them in the imports array of @NgModule
We can now use HttpClient and reactive forms in our application!
Creating an Angular Service For Handling File Uploads
Let's proceed by creating an Angular service that will handle file uploading. Open a new terminal, navigate to your frontend project and run the following command:
$ ng generate service upload
Open the src/app/upload.service.ts file and add the following imports:
import { HttpClient, HttpEvent, HttpErrorResponse, HttpEventType } from  '@angular/common/http';
import { map } from  'rxjs/operators';
Next, inject HttpClient via the constructor and define the SERVER_URL variable which holds the address of the server:
@Injectable({
  providedIn: 'root'
})
export class UploadService {

  SERVER_URL: string = "http://localhost:3000";
  constructor(private httpClient: HttpClient) { }
Next, add the upload() method which handles posting the form data to the server:
  public upload(data, userId) {
    let uploadURL = `${this.SERVER_URL}/auth/${userId}/avatar`;

    return this.httpClient.post<any>(uploadURL, data, {
      reportProgress: true,
      observe: 'events'
    }).pipe(map((event) => {

      switch (event.type) {

        case HttpEventType.UploadProgress:
          const progress = Math.round(100 * event.loaded / event.total);
          return { status: 'progress', message: progress };

        case HttpEventType.Response:
          return event.body;
        default:
          return `Unhandled event: ${event.type}`;
      }
    })
    );
  }
Creating Component and Reactive Form
In your terminal, run the following command to generate a component:
$ ng generate component profile
Open the src/app/app-routing.module.ts file and add a route to the component:
const routes: Routes = [
  {path: 'profile', component: ProfileComponent}
];
Open the src/app/profile/profile.component.ts file, import FormBuilder, FormGroup and UploadService then inject UploadService and FormBuilder via the constructor:
import { FormBuilder, FormGroup } from  '@angular/forms';
import { UploadService } from  '../upload.service';

@Component({
  selector: 'app-profile',
  templateUrl: './profile.component.html',
  styleUrls: ['./profile.component.css']
})
export class ProfileComponent implements OnInit {
  constructor(private formBuilder: FormBuilder, private uploadService: UploadService) { }
Next, define the following variables:
@Component({
  selector: 'app-profile',
  templateUrl: './profile.component.html',
  styleUrls: ['./profile.component.css']
})
export class ProfileComponent implements OnInit {

  form: FormGroup;
  error: string;
  userId: number = 1;
  uploadResponse = { status: '', message: '', filePath: '' };
Note: In this example we assume that you have created a user in your database that has an id of 1. We'll be changing the avatar of this user. In a real world scenario you'll need to set
userIdproperly, for example from the local storage of your application after the user has successfully logged in and stored the information in the local storage.
Next, add create a reactive form on the ngOnInit() life-cycle method:
  ngOnInit() {
    this.form = this.formBuilder.group({
      avatar: ['']
    });
  }
Finally, add these two methods for handling selecting a file and submitting the form:
  onFileChange(event) {
    if (event.target.files.length > 0) {
      const file = event.target.files[0];
      this.form.get('avatar').setValue(file);
    }
  }

  onSubmit() {
    const formData = new FormData();
    formData.append('file', this.form.get('avatar').value);

    this.uploadService.upload(formData, this.userId).subscribe(
      (res) => this.uploadResponse = res,
      (err) => this.error = err
    );
  }
We create a a variable of FormData type and we append a field named file. Pay attention to the name of this field, it should be the same name that your server expects otherwise the server will not be able to extract the file.
We then send the form data to the server from Angular by calling the upload() method of UploadService which also takes the user ID as a second argument. As we mentioned before, the user is is simply hard-coded to a value of 1 so you need to make sure you have a user in your database with an id of 1.
Next, we need to create the HTML template. Open the src/app/profile/profile.component.html file and add the following content:
<h1>Upload your Avatar!</h1>
<div>
  <div *ngIf="error">
    {{ error.message }}
  </div>
  <div *ngIf="uploadResponse.status === 'error'">
    {{ uploadResponse.message }}
  </div>
  <div *ngIf="uploadResponse.status === 'progress'">


    <div role="progressbar" [style.width.%]="uploadResponse.message" aria-valuenow="25" aria-valuemin="0" aria-valuemax="100">
      {{uploadResponse.message}}%
    </div>

  </div>

  <form [formGroup]="form" (ngSubmit)="onSubmit()">

    <input type="file" name="avatar" (change)="onFileChange($event)" />
    <button type="submit">Upload</button>

  </form>
</div>
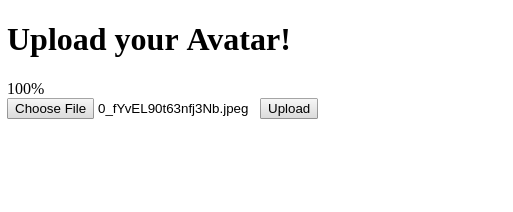
This is a screenshot of the interface:
Conclusion
In this tutorial, we'he seen how you can upload image files from an Angular 9 UI to a Nest.js server using HttpClient and a reactive form.
We'he also seen how we can listen for HttpClient progress events.