Mock a REST API Back-End for Your Angular 10/9 App with JSON-Server and Faker.js
In this tutorial, we’ll learn, with a quick example, how to mock a REST API back-end for your Angular 10/9 application which you can consume using Angular 10 HttpClient even before your real back-end is ready.
We'll use two powerful open source packages, json-server and faker.js and we assume that you have an Angular project ready.
Please note that both json-server and faker.js are framework agnostic i.e you can use them with any JavaScript framework such as Vue.js or React but in this example we'll use them in the context of an Angular project.
Why Mocking a Back-End for your Angular 10 App?
More often than not, modern web development involves multiple developers working in separate front-end and back-end applications. This approach has many advantages, such as the separation of concerns but also introduces a few challenges such as the difficulties in coordination between the front-end and back-end developers. Here comes the role of tools such as JSON-Server to ease these difficulties. As a front-end developer, JSON-Server is such a great tool that allows you to spin up a REST API server with a fully-working API with zero coding.
Read to build a real REST API example or also this tutorial which implements a TypeScript/Node.js REST API with JWT Auth. But, as far as Angular concerned, there is no difference between consuming a mocked or real REST API.
How to Mock A REST API Back-End?
Let's now see how to mock a RESTful API back-end using json-server.
Go to a new terminal, navigate to your Angular project and install json-server from npm:
$ cd ~/angular-example
$ npm install --save json-server
Next, create a database.json file inside a server folder with the following object:
{
    "products": []
}
We need to add data to this file that will be returned from our REST API endpoints. We can use Faker.js for automatically generating big amounts of data that looks realistic.
Head over to your terminal, go to the root of your Angular project, and install Faker.js from npm:
$ cd ..
$ npm install faker --save
Now, create a generateData.js file and add the following code:
var faker = require('faker');

var database = { products: []};

for (var i = 1; i<= 300; i++) {
  database.products.push({
    id: i,
    name: faker.commerce.productName(),
    description: faker.lorem.sentences(),
    price: faker.commerce.price(),
    imageUrl: "https://source.unsplash.com/1600x900/?product",
    quantity: faker.random.number()
  });
}

console.log(JSON.stringify(database));
Next, add the generateData and runServer scripts to the package.json file:
{
  "name": "angulardemo",
  "version": "0.0.0",
  "scripts": {
    "ng": "ng",
    "start": "ng serve",
    "build": "ng build",
    "test": "ng test",
    "lint": "ng lint",
    "e2e": "ng e2e",
    "generate": "node ./server/generate.js > ./server/database.json",
    "server": "json-server --watch ./server/database.json"
  },
Next, go to your terminal and let’s create some data for our REST API:
$ npm run generateData
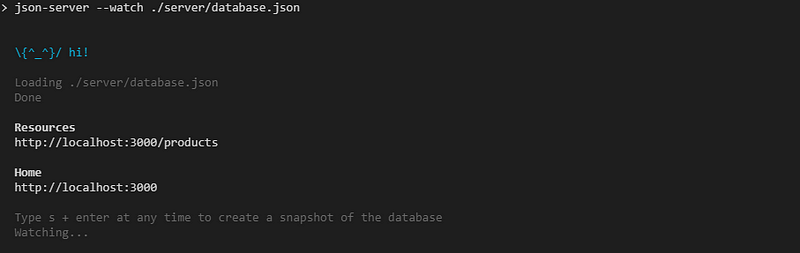
Finally, run the REST API server using:
$ npm run runServer
Your REST API server will be available from the [http://localhost:3000/](http://localhost:3000/) address.
These are the available API endpoints that we ca consume using Angular HttpClient:
-
GET /productsfor getting the products, -
GET /products/<id>for getting a single product by id, -
POST /productsfor creating a new product, -
PUT /products/<id>for updating a product by id, -
PATCH /products/<id>for partially updating a product by id, -
DELETE /products/<id>for deleting a product by id.
You can make use of the _page and _limit parameters to retrieve pages of data. In the Link header of the HTTP response you'll have the first, prev, next and last links.
Conclusion
Thanks to json-server you can boost your productivity when developing your Angular 10 front-end without waiting for the back-end features to be ready. Since json-server is based on Express.js, it's even possible to add advanced features to your mocked back-end such as authentication and route protection. Check out this tutorial for an example with authentication or also this npm package.


