Angular 10/9 Tutorial and Example: Build your First Angular App
In this tutorial, we will learn by example to create a first application with Angular 10/9 from scratch.
This is an updated version of this Angular 8 tutorial and this second part.

Angular 10 Tutorial Learning Outcomes
We'll learn about concepts like Angular 10 modules, components and directives.
We'll also learn about Angular 10/9 template syntax which includes interpolation, event binding and property binding, etc.
For the example that we'll be building, it's a simple calculator application that implements the basic calculus operations.
You'll learn from this tutorial:
- How to install the latest version of Angular 10/9 CLI,
- How to initialize a new Angular 10/9 project,
- Understand and work with modules and components,
- Understand Angular 10/9 template syntax, particularly event and property bindings,
- Listen for click events and update the UI when data changes.
Angular 10/9 Tutorial Steps
These are the steps:
- Step 1 - Installing Angular CLI 10/9
- Step 2 - Initializing our Project
- Step 3 - Understanding Angular 10/9 Modules & Components
- Step 4 - Adding our HTML Template and Styles
- Step 5 - Understanding Angular 10/9 Template Syntax
- Step 6 - Listenning for Click Events on the Buttons and Get their Associated Values
- Step 7 - Displaying the Value of Variables in the Template
Prerequisites
You'll need to have the following prerequisites for a better understanding of this tutorial:
- A working knowledge of HTML, CSS and JavaScript/TypeScript. You don't need to be an expert in TypeScript but a familiarity with OOP concepts such as classes and constructors is required.
- Node.js and NPM installed on your development machine.
See Working with Imports, Decorators, Async/Await and FormData in TypeScript and Angular
You can check out how install Node and NPM to set up a development environment for Angular on Ubuntu.
Step 1 - Installing Angular CLI 10/9
Let's start our journey by installing the latest version of Angular CLI in our development machine.
Open a new terminal on Ubuntu/macOS or a command prompt on Windows and run the following command:
$ npm install -g @angular/cli@next
At the time of this writing, we need to add the @next tag to install the latest pre-release version of Angular CLI. If you want to install Angular 9, just remove the next tag.
Step 2 - Initializing our Angular 10/9 Project
If you have installed Angular CLI v10/9 in your machine, let's use it to initialize a new project. Head back to your terminal or command prompt and simply run the following command:
$ ng new angular10example-calculator
Before generating your project, the CLI will prompt you if you would like to add routing to your project - You can answer No because we'll not be using the router in this example. For the stylesheets format, let's go with CSS.
Next, let's start a live-reload development server using the following commands:
$ cd ./angular10example-calculator
$ ng serve
The server will be running at the http://localhost:4200 address.
Step 3 - Understanding Angular 10/9 Modules & Components
Angular 10 adheres to the modular and component-based architectures.
The modular architecture allows you to organize your Angular 10/9 application in modules.
From the Angular docs, this is how a module is defined:
Angular 10/9 apps are modular and Angular has its own modularity system called NgModules. NgModules are containers for a cohesive block of code dedicated to an application domain, a workflow, or a closely related set of capabilities. They can contain components, service providers, and other code files whose scope is defined by the containing NgModule. They can import functionality that is exported from other NgModules, and export selected functionality for use by other NgModules.
The Angular 10/9 platform itself is comprised of a set of built-in modules such as the core module, FormsModule, and HttpClientModule, etc.
A simple rule is creating a module for each feature of your application. For example, authentication can be isolated in each own module.
Note: In our Angular 10/9 project generated with the CLI, we already have a root module which, by convention, named
AppModule.
Open the src/app/app.module.ts file, you should see the following code which creates an NgModule:
Note: You can generate a new module using the
ng generate module <name>command.
Since this is our first example, let's keep it simple and use the root module for encapsulating our calculator code.
What About Angular 10/9 Components?
The component-based architecture allows you to use components to compose your application.
Note: In our Angular 10/9 project generated with the CLI, we already have a root component which is, by convention, named
AppComponent.
A component controls a part of the screen of your application. In terms of code, it is simply a TypeScript class (decorated with @Component) with an HTML template for rendering the view and a stylesheets file for presentation.
Head to a new terminal or command prompt, go to your project's directory and run the following command:
$ ng generate component calculator --skipTests
We use --skipTests to instruct the CLI to skip generating a file for component tests.
The CLI has generated the following files in the src/app/calculator folder:
src/app/calculator/calculator.component.cssfor CSS styles.src/app/calculator/calculator.component.htmlfor the component's template or the view.src/app/calculator/calculator.component.tsfor the component logic.
Go ahead and open the src/app/calculator/calculator.component.ts file, you should see the following code:
import { Component, OnInit } from '@angular/core';

@Component({
  selector: 'app-calculator',
  templateUrl: './calculator.component.html',
  styleUrls: ['./calculator.component.css']
})
export class CalculatorComponent implements OnInit {

  constructor() { }

  ngOnInit() {
  }

}
We first define a TypeScript class and decorate it with the @Component() decorator which provides the following metadata:
selectorwhich is used to provide a tag name for the component,just like regular HTML tags except that they are only available in your Angular 10/9 app.templateUrlwhich is used to link an HTML template for rendering the view of the component. You can also use an inline template with thetemplateproperty instead.styleUrlswhich is used to assign stylesheets files for styling the view of the component.
Here is the magic of Angular 10/9! We can invoke our component using the <app-calculator> tag. It's like HTML tags but these are custom tags that are only available inside your Angular 10/9 application.
Go ahead and open the src/app/app.component.html file, which is the template associated with the root component of our application which means it gets first rendered when the app is bootstrapped, remove the existing markup and add:
<app-calculator></app-calculator>
Step 4: Adding our HTML Template and Styles
Let's now implement our component.
We'll be using the HTML and CSS code from this JS fiddle to create our component UI.
Open the src/app/calculator/calculator.component.html file and add:
<div class="calculator">
<input type="text" class="calculator-screen" value="0" disabled />
<div class="calculator-keys">
<button type="button" class="operator" value="+">+</button>
<button type="button" class="operator" value="-">-</button>
<button type="button" class="operator" value="*">×</button>
<button type="button" class="operator" value="/">÷</button>
<button type="button" value="7">7</button>
<button type="button" value="8">8</button>
<button type="button" value="9">9</button>
<button type="button" value="4">4</button>
<button type="button" value="5">5</button>
<button type="button" value="6">6</button>
<button type="button" value="1">1</button>
<button type="button" value="2">2</button>
<button type="button" value="3">3</button>
<button type="button" value="0">0</button>
<button type="button" class="decimal" value=".">.</button>
<button type="button" class="all-clear" value="all-clear">AC</button>
<button type="button" class="equal-sign" value="=">=</button>
</div>
</div>
Angular 10/9 allows you to use most of the regular HTML tags to build the views of your app. We have a set of divisions with input and button elements.
Next, open the src/app/calculator/calculator.component.css file and add the following CSS styles:
.calculator {
    border: 1px solid #ccc;
    border-radius: 5px;
    position: absolute;
    top: 50%;
    left: 50%;
    transform: translate(-50%, -50%);
    width: 400px;
  }

  .calculator-screen {
    width: 100%;
    font-size: 5rem;
    height: 80px;
    border: none;
    background-color: #252525;
    color: #fff;
    text-align: right;
    padding-right: 20px;
    padding-left: 10px;
  }

  button {
    height: 60px;
    background-color: #fff;
    border-radius: 3px;
    border: 1px solid #c4c4c4;
    background-color: transparent;
    font-size: 2rem;
    color: #333;
    background-image: linear-gradient(to bottom,transparent,transparent 50%,rgba(0,0,0,.04));
    box-shadow: inset 0 0 0 1px rgba(255,255,255,.05), inset 0 1px 0 0 rgba(255,255,255,.45), inset 0 -1px 0 0 rgba(255,255,255,.15), 0 1px 0 0 rgba(255,255,255,.15);
    text-shadow: 0 1px rgba(255,255,255,.4);
  }

  button:hover {
    background-color: #eaeaea;
  }

  .operator {
    color: #337cac;
  }

  .all-clear {
    background-color: #f0595f;
    border-color: #b0353a;
    color: #fff;
  }

  .all-clear:hover {
    background-color: #f17377;
  }

  .equal-sign {
    background-color: #2e86c0;
    border-color: #337cac;
    color: #fff;
    height: 100%;
    grid-area: 2 / 4 / 6 / 5;
  }

  .equal-sign:hover {
    background-color: #4e9ed4;
  }

  .calculator-keys {
    display: grid;
    grid-template-columns: repeat(4, 1fr);
    grid-gap: 20px;
    padding: 20px;
  }
Next, let's add some global styles. Open the src/styles.css file and add:
html {
    font-size: 62.5%;
    box-sizing: border-box;
  }

*, *::before, *::after {
    margin: 0;
    padding: 0;
    box-sizing: inherit;
}
Global styles will be applied to all the components of our app where component styles are scoped to that component.
Go to your app in your web browser, you'll see the following UI:
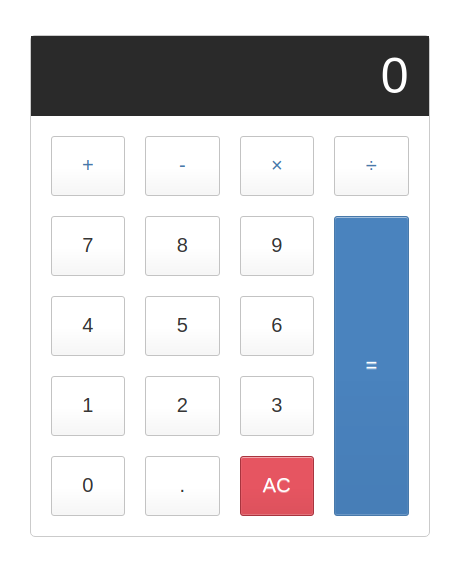
At this point, this is a regular HTML file which doesn't include any Angular code.
If you are building your app with plain JavaScript, you'll need to query the DOM elements and attach your defined functions to various events to implement your calculator but you don't need to do that in our case thanks to the Angular template syntax.
Also read 3+ ways to add Bootstrap to Angular and how to style your Angular 10 app with Bootstrap 4.
Step 5 - Understanding Angular 10/9 Template Syntax
Angular 10/9 provides a powerful syntax that extends regular HTML with various constructs for interpolating variables, binding methods to events, or iterating over arrays of data.
We'll be particularly learning about event and property bindings.
What is Data Binding?
Data binding is a mechansim implemented in most modern frameworks that establishes a connection between the component view and the data in the component's class in such a way that when the data variables changes, the elements that are bound to the data reflect changes automatically and vice versa.
With Angular 10/9 data bindings, you don't need to manually push data from your component to the DOM and back. This means you don't need to call methods like querySelector() or querySelectorAll() and listenning for events to synchronize the views with data changes and vice versa. This is done automatically for you!
Angular 10/9 provides four types of data binding depending on how data flows i.e from the component to the DOM, from the DOM to the component or both ways:
or interpolation which is used when you want to display data from the component in the associated view. For example, if you defined a foobar variable in your component, you can display its value using.[ ]or property binding which is used when you want to push data to a property of an element in the DOM. It binds a variable in the component to an attribute of a DOM such as the value attribue of an<input>tag. For example:<input type="text" [value]="foobar">.( )or event binding which is used to listen for DOM events and bind them to methods in your component. For example:<button (click)="runAction()">Click Me</button>- TherunAction()method will be called so it needs to be defined in the component class.[( )]or two-way data binding which is used if you want data to flow in both ways. For example:<input type="text" [(ngModel)]="foobar">. The input element andfoobarwill have the same value and when one changes, the other one changes to the same value accordingly. We use the banana in the box syntax which combines brackets and parentheses for two-way data binding.ngModelis a special directive that binds to thevalueattribute of the<input>and<textarea>elements but you can constrcut two-way data binding for any property in the DOM or component.
Now let's apply this knowledge to make a functional Angular 10/9 app.
Step 6 - Listenning for Click Events on the Buttons and Get their Associated Values
Basically, we want to get the values associated with the clicked buttons which can be either a number or a type of an operation. After calculating the result, we want to display it in the result element.
In the template, we have four sets of keys:
- digits (0-9),
- operators (+, -, *, /, =),
- a decimal point (.)
- and a reset key.
Let's use Angular 10/9 event binding to listen for clicks on the buttons and determine what type of key was clicked.
Defining Some Needed Variables
Open the src/app/calculator/calculator.component.ts file and start by defining the following variables in the component:
export class CalculatorComponent implements OnInit {

  currentNumber = '0';
  firstOperand = null;
  operator = null;
  waitForSecondNumber = false;
- The
currentNumbervariable holds the string that will be displayed in the result input element. - The
firstOperandvariable holds the value of the first operand of the operation. - The
operatorvariable holds the operation. - The
waitForSecondNumbervariable holds a boolean value indicating if the user has finished typing the first operand and ready to enter the second operand of the operation.
Defining Listenning Methods
Next, define the getNumber() method that will be used to get the current number:
  public getNumber(v: string){
    console.log(v);
    if(this.waitForSecondNumber)
    {
      this.currentNumber = v;
      this.waitForSecondNumber = false;
    }else{
      this.currentNumber === '0'? this.currentNumber = v: this.currentNumber += v;

    }
  }
Next, define the getDecimal() method which appends the decimal point to the current number:
  getDecimal(){
    if(!this.currentNumber.includes('.')){
        this.currentNumber += '.';
    }
  }
Next, define the doCalculation() method which performs the calculation depending on the operator type:
  private doCalculation(op , secondOp){
    switch (op){
      case '+':
      return this.firstOperand += secondOp;
      case '-':
      return this.firstOperand -= secondOp;
      case '*':
      return this.firstOperand *= secondOp;
      case '/':
      return this.firstOperand /= secondOp;
      case '=':
      return secondOp;
    }
  }
Next, define the getOperation() that will be used to get the performed operation:
  public getOperation(op: string){
    console.log(op);

    if(this.firstOperand === null){
      this.firstOperand = Number(this.currentNumber);

    }else if(this.operator){
      const result = this.doCalculation(this.operator , Number(this.currentNumber))
      this.currentNumber = String(result);
      this.firstOperand = result;
    }
    this.operator = op;
    this.waitForSecondNumber = true;

    console.log(this.firstOperand);

  }
Finally, define the clear() method that will be used to clear the result area and reset the calculations:
  public clear(){
    this.currentNumber = '0';
    this.firstOperand = null;
    this.operator = null;
    this.waitForSecondNumber = false;
  }
Now, you need to use event binding to bind these methods to the template.
We need to use Angular 10/9 event binding to bind the getNumber() method to the click event of buttons. Changte your component template as follows:
<div class="calculator">

  <input type="text" class="calculator-screen" disabled />

  <div class="calculator-keys">

    <!-- [...] -->

    <button type="button" (click) = "getNumber('7')" value="7">7</button>
    <button type="button" (click) = "getNumber('8')" value="8">8</button>
    <button type="button" (click) = "getNumber('9')" value="9">9</button>


    <button type="button" (click) = "getNumber('4')" value="4">4</button>
    <button type="button" (click) = "getNumber('5')" value="5">5</button>
    <button type="button" (click) = "getNumber('6')" value="6">6</button>


    <button type="button" (click) = "getNumber('1')" value="1">1</button>
    <button type="button" (click) = "getNumber('2')" value="2">2</button>
    <button type="button" (click) = "getNumber('3')" value="3">3</button>


    <button type="button" (click) = "getNumber('0')" value="0">0</button>
    <!-- [...] -->
  </div>
</div>
We use () around the click event of the button to create an event binding.
Next, let's bind the getOperation(), getDecimal() and clear() methods to the click event of their respective buttons:
<div class="calculator-keys">
<button type="button" (click) = "getOperation('+')" class="operator" value="+">+</button>
<button type="button" (click) = "getOperation('-')" class="operator" value="-">-</button>
<button type="button" (click) = "getOperation('*')" class="operator" value="*">×</button>
<button type="button" (click) = "getOperation('/')" class="operator" value="/">÷</button>
<!-- [...] -->
<button type="button" (click) = "getDecimal()" class="decimal" value=".">.</button>
<button type="button" (click) = "clear()" class="all-clear" value="all-clear">AC</button>
<button type="button" (click) = "getOperation('=')" class="equal-sign" value="=">=</button>
</div>
</div>
Step 7 - Displaying the Value of the Variable in the Angular 10/9 Template
Now let's display the value of the currentNumber variable that contains the value of the typed number by binding to variable to the value attribute of the <input> element:
<div class="calculator">

  <input type="text" class="calculator-screen" [value]="currentNumber" disabled />

  <!-- [...] -->
We use [] around the value attribute to create a property binding.
The currentNumber variable will also contain the final result of the operation.
Conclusion
In this tutorial, we have barely scratched the surface of what we can do with Angular 10/9. As a re-wrap:
We've installed Angulae CLI v10/9 and initialized a new project. Next we learned about modules and components, created a component, added global and component styles and seen the various types of data bindings.
-
Date:
Buy our ebook: Angular 17 from Scratch - Build an ecommerce app step by step!

Subscribe to our Angular Newsletter and Get 4 Angular eBooks for Free
- Ebook 1: Angular standalone components
- Ebook 2: Learn Angular In 15 Easy Steps
- Ebook 3: Practical Angular: Build 5 Apps From Scratch!
- Ebook 4: Build a Movies App with Angular 18 and Tailwind


