Laravel 8 REST API CRUD Tutorial by Example App with Bootstrap 4 and MySQL

Throughout this tutorial for beginners you'll learn to use Laravel 8 - the latest version of one of the most popular PHP frameworks - to create a REST API CRUD web application with a MySQL database and Bootstrap 4 styles from scratch and step by step starting with the installation of Composer (PHP package manager) to implementing and serving your application.
This tutorial is updated from our Laravel 6/7 tutorial
Creating our Laravel 8 CRUD REST API
Before implementing our Laravel 8 REST API CRUD application, let's see the prerequisites that we'll need to have for this tutorial.
Prerequisites
This tutorial assumes you have PHP and MySQL installed on your system. Follow the instructions for your operating system to install both of them.
You also need to be familiar with Linux/macOS bash where we'll be executing the commands in this tutorial.
Familiarly with PHP is required since Laravel 8 is based on PHP.
For development I will be using a Ubuntu 18.04+ machine so the commands in this tutorial are targeting this system but you should be able to follow this tutorial in any operating system you use.
Please check out the previous tutorial for how to Install Laravel 8 and PHP 7.3.
We have cover the following topics in our previous post:
- Installing PHP 7.3+
- Installing the Required PHP 7.3 Modules
- Installing PHP Composer
- Installing and Creating a Laravel 8 Project
- Installing the Front-End Dependencies
After we have installed Laravel 8 and created a new project, let's create our Laravel 8 REST API example.
Creating a MySQL Database
Let's start by creating a MySQL database that we'll use to persist dat ain our Laravel 8 REST API application.
In your terminal, run the following command to run the mysql client:
$ mysql -u root -p
When prompted, enter the password for your MySQL server when you've installed it.
Next, run the following SQL statement to create a db database:
mysql> create database db;
Open the .env file and update the credentials to access your MySQL database:
DB_CONNECTION=mysql
DB_HOST=127.0.0.1
DB_PORT=3306
DB_DATABASE=db
DB_USERNAME=root
DB_PASSWORD=******
You need to enter the database name, the username and password.
At this point, you can run the migrate command to create your database and a bunch of SQL tables needed by Laravel:
$ php artisan migrate
Note: You can run the
migratecommand at any other points of your development to add other SQL tables in your database or to later your database if you need to add any changes later.
Creating your First Laravel 8 Model
Laravel uses the MVC architectural pattern to organize your application in three decoupled parts:
- The Model which encapsulates the data access layer,
- The View which encapsulates the representation layer,
- Controller which encapsulates the code to control the application and communicates with the model and view layers.
Wikipedia defines MVC as:
Model–view–controller is an architectural pattern commonly used for developing user interfacesthat divides an application into three interconnected parts. This is done to separate internal representations of information from the ways information is presented to and accepted from the user.
See Laravel Database Migrations Tutorial with Admin Roles Example
Now, let's create our first Laravel Model. In your terminal, run the following command:
$ php artisan make:model Contact --migration
This will make a Contact.php model file inside the app/Models directory of your Laravel 8 project and a migration file will be created inside the database migrations directory.
In the terminal, we get an output similar to:
Model created successfully.
Created Migration: 2020_09_20_193840_create_contacts_table
Open the database/migrations/xxxxxx_create_contacts_table migration file and update it accordingly:
<?php

use Illuminate\Support\Facades\Schema;
use Illuminate\Database\Schema\Blueprint;
use Illuminate\Database\Migrations\Migration;

class CreateContactsTable extends Migration
{
    /**
     * Run the migrations.
     *
     * @return void
     */
    public function up()
    {
        Schema::create('contacts', function (Blueprint $table) {
            $table->increments('id');
            $table->timestamps();
            $table->string('first_name');
            $table->string('last_name');
            $table->string('email');
            $table->string('job_title');
            $table->string('city');
            $table->string('country');
        });
    }

    /**
     * Reverse the migrations.
     *
     * @return void
     */
    public function down()
    {
        Schema::dropIfExists('contacts');
    }
}
We added the first_name, last_name, email, job_title, city and country fields in the contacts table.
You can now create the contacts table in the database using the following command:
$ php artisan migrate
Now, let's look at our Contact model, which will be used to interact with the contacts database table. Open the app/Models/Contact.php file and update it as follows:
<?php

namespace App;

use Illuminate\Database\Eloquent\Model;

class Contact extends Model
{
    protected $fillable = [
        'first_name',
        'last_name',
        'email',
        'city',
        'country',
        'job_title'
    ];
}
Creating the Laravel 8 Controller and Routes
After creating the model and migrated our database. Let's now create the controller and the routes for working with the Contact model. In your terminal, run the following command:
$ php artisan make:controller ContactController --resource
Laravel resource routing assigns the typical "CRUD" routes to a controller with a single line of code. For example, you may wish to create a controller that handles all HTTP requests for "photos" stored by your application. Using the
make:controllerArtisan command, we can quickly create such a controller:This command will generate a controller at
app/Http/Controllers/ContactController.php. The controller will contain a method for each of the available resource operations.
Open the app/Http/Controllers/ContactController.php file. This is the initial content:
<?php

namespace App\Http\Controllers;

use Illuminate\Http\Request;

class ContactController extends Controller
{
    /**
     * Display a listing of the resource.
     *
     * @return \Illuminate\Http\Response
     */
    public function index()
    {
        //
    }

    /**
     * Show the form for creating a new resource.
     *
     * @return \Illuminate\Http\Response
     */
    public function create()
    {
        //
    }

    /**
     * Store a newly created resource in storage.
     *
     * @param  \Illuminate\Http\Request  $request
     * @return \Illuminate\Http\Response
     */
    public function store(Request $request)
    {
        //
    }

    /**
     * Display the specified resource.
     *
     * @param  int  $id
     * @return \Illuminate\Http\Response
     */
    public function show($id)
    {
        //
    }

    /**
     * Show the form for editing the specified resource.
     *
     * @param  int  $id
     * @return \Illuminate\Http\Response
     */
    public function edit($id)
    {
        //
    }

    /**
     * Update the specified resource in storage.
     *
     * @param  \Illuminate\Http\Request  $request
     * @param  int  $id
     * @return \Illuminate\Http\Response
     */
    public function update(Request $request, $id)
    {
        //
    }

    /**
     * Remove the specified resource from storage.
     *
     * @param  int  $id
     * @return \Illuminate\Http\Response
     */
    public function destroy($id)
    {
        //
    }
}
The ContactController class extends Controller class available from Laravel and defines a bunch of methods which will be used to do the CRUD operations against the Contact model.
You can read the role of the method on the comment above it.
Now we need to provide implementations for these methods.
But before that, let's add routing. Open the routes/web.php file and update it accordingly:
<?php
Route::get('/', function () {
    return view('welcome');
});

Route::resource('contacts', 'App\Http\Controllers\ContactController');
In previous versions of Laravel, there was a property in the
RouteServiceProvider.phpcalled $namespace that was used to prefix the namespace of your controllers automatically by addingApp\Http\Controllersbut in Laravel 8, you should add that yourself.
You can also use the following syntax:
Route::resource('contacts', ContactController::class);
Using the resource() static method of Route, you can create multiple routes to expose multiple actions on the resource.
These routes are mapped to various ContactController methods which will need to implement in the next section:
- GET
/contacts, mapped to theindex()method, - GET
/contacts/create, mapped to thecreate()method, - POST
/contacts, mapped to thestore()method, - GET
/contacts/{contact}, mapped to theshow()method, - GET
/contacts/{contact}/edit, mapped to theedit()method, - PUT/PATCH
/contacts/{contact}, mapped to theupdate()method, - DELETE
/contacts/{contact}, mapped to thedestroy()method.
These routes are used to serve HTML templates and also as API endpoints for working with the Contact model.
Note: If you want to create a controller that will only expose a RESTful API, you can use the
apiResourcemethod to exclude the routes that are used to serve the HTML templates:
Route::apiResource('contacts', 'ContactController');
Implementing the CRUD Operations
Let's now implement the controller methods alongside the views.
C: Implementing the Create Operation and Adding a Form
The ContactController includes the store() method that maps to the POST /contacts API endpoint which will be used to create a contact in the database and the create() that maps to the GET /contacts/create route which will be used to serve the HTML form used to submit the contact to POST /contacts API endpoint.
Let's implement these two methods.
Re-open the app/Http/Controllers/ContactController.php file and start by importing the Contact model:
use App\Contact;
Next, locate the store() method and update it accordingly:
    public function store(Request $request)
    {
        $request->validate([
            'first_name'=>'required',
            'last_name'=>'required',
            'email'=>'required'
        ]);

        $contact = new Contact([
            'first_name' => $request->get('first_name'),
            'last_name' => $request->get('last_name'),
            'email' => $request->get('email'),
            'job_title' => $request->get('job_title'),
            'city' => $request->get('city'),
            'country' => $request->get('country')
        ]);
        $contact->save();
        return redirect('/contacts')->with('success', 'Contact saved!');
    }
Next, locate the create() method and update it:
    public function create()
    {
        return view('contacts.create');
    }
The create() function makes use of the view() method to return the create.blade.php template which needs to be present in the resources/views folder.
Before creating the create.blade.php template we need to create a base template that will be extended by the create template and all the other templates that will create later in this tutorial.
In the resources/views folder, create a base.blade.php file:
$ cd resources/views
$ touch base.blade.php
Open the resources/views/base.blade.php file and add the following blade template:
<!DOCTYPE html>
<html lang="en">
<head>
  <meta name="viewport" content="width=device-width, initial-scale=1.0">
  <title>Laravel 8 & MySQL CRUD Tutorial</title>
  <link href="{{ asset('css/app.css') }}" rel="stylesheet" type="text/css" />
</head>
<body>
  <div class="container">
    @yield('main')
  </div>
  <script src="{{ asset('js/app.js') }}" type="text/js"></script>
</body>
</html>
Now, let's create the create.blade.php template. First, create a contacts folder in the views folder:
$ mkdir contacts
Next, create the template
$ cd contacts
$ touch create.blade.php
Open the resources/views/contacts/create.blade.php file and add the following code:
@extends('base')

@section('main')
<div class="row">
 <div class="col-sm-8 offset-sm-2">
    <h1 class="display-3">Add a contact</h1>
  <div>
    @if ($errors->any())
      <div class="alert alert-danger">
        <ul>
            @foreach ($errors->all() as $error)
              <li>{{ $error }}</li>
            @endforeach
        </ul>
      </div><br />
    @endif
      <form method="post" action="{{ route('contacts.store') }}">
          @csrf
          <div class="form-group">
              <label for="first_name">First Name:</label>
              <input type="text" class="form-control" name="first_name"/>
          </div>

          <div class="form-group">
              <label for="last_name">Last Name:</label>
              <input type="text" class="form-control" name="last_name"/>
          </div>

          <div class="form-group">
              <label for="email">Email:</label>
              <input type="text" class="form-control" name="email"/>
          </div>
          <div class="form-group">
              <label for="city">City:</label>
              <input type="text" class="form-control" name="city"/>
          </div>
          <div class="form-group">
              <label for="country">Country:</label>
              <input type="text" class="form-control" name="country"/>
          </div>
          <div class="form-group">
              <label for="job_title">Job Title:</label>
              <input type="text" class="form-control" name="job_title"/>
          </div>
          <button type="submit" class="btn btn-primary-outline">Add contact</button>
      </form>
  </div>
</div>
</div>
@endsection
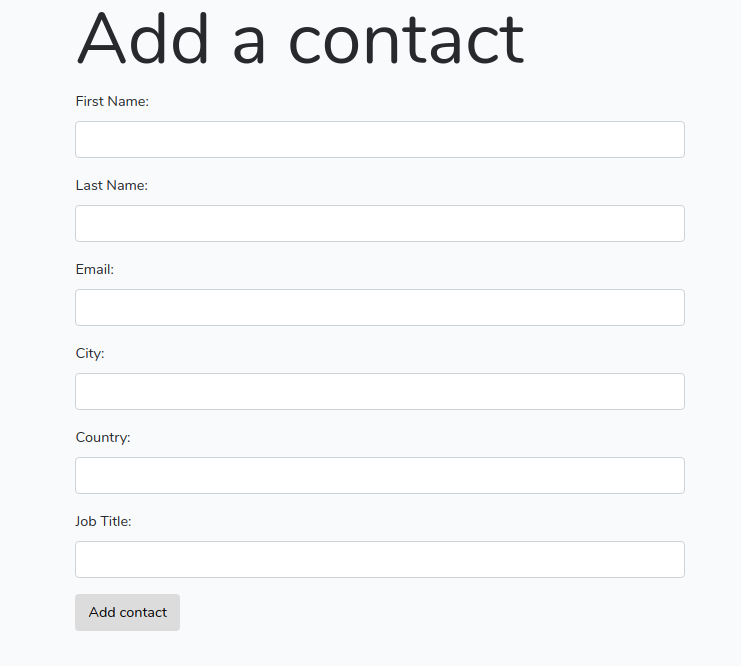
This is a screenshot of our create form!

Fill out the form and click on the Add contact button to create a contact in the database. You should be redirected to /contacts route which doesn't have a view associated to it yet.
R: Implementing the Read Operation and Getting Data
Next, let's implement the read operation to get and display contacts data from our MySQL database.
Go to the app/Http/Controllers/ContactController.php file, locate the index() method and update it:
    public function index()
    {
        $contacts = Contact::all();

        return view('contacts.index', compact('contacts'));
    }
Next, you need to create the the index template. Create a resources/views/contacts.index.blade.php file:
$ touch index.blade.php
Open the resources/views/contacts/index.blade.php file and add the following code:
@extends('base')

@section('main')
<div class="row">
<div class="col-sm-12">
    <h1 class="display-3">Contacts</h1>
  <table class="table table-striped">
    <thead>
        <tr>
          <td>ID</td>
          <td>Name</td>
          <td>Email</td>
          <td>Job Title</td>
          <td>City</td>
          <td>Country</td>
          <td colspan = 2>Actions</td>
        </tr>
    </thead>
    <tbody>
        @foreach($contacts as $contact)
        <tr>
            <td>{{$contact->id}}</td>
            <td>{{$contact->first_name}} {{$contact->last_name}}</td>
            <td>{{$contact->email}}</td>
            <td>{{$contact->job_title}}</td>
            <td>{{$contact->city}}</td>
            <td>{{$contact->country}}</td>
            <td>
                <a href="{{ route('contacts.edit',$contact->id)}}" class="btn btn-primary">Edit</a>
            </td>
            <td>
                <form action="{{ route('contacts.destroy', $contact->id)}}" method="post">
                  @csrf
                  @method('DELETE')
                  <button class="btn btn-danger" type="submit">Delete</button>
                </form>
            </td>
        </tr>
        @endforeach
    </tbody>
  </table>
<div>
</div>
@endsection
U: Implementing the Update Operation
Next, we need to implement the update operation. Go to the app/Http/Controllers/ContactController.php file, locate the edit($id) method and update it:
    public function edit($id)
    {
        $contact = Contact::find($id);
        return view('contacts.edit', compact('contact'));
    }
Next, you need to implement the update() method:
    public function update(Request $request, $id)
    {
        $request->validate([
            'first_name'=>'required',
            'last_name'=>'required',
            'email'=>'required'
        ]);

        $contact = Contact::find($id);
        $contact->first_name =  $request->get('first_name');
        $contact->last_name = $request->get('last_name');
        $contact->email = $request->get('email');
        $contact->job_title = $request->get('job_title');
        $contact->city = $request->get('city');
        $contact->country = $request->get('country');
        $contact->save();

        return redirect('/contacts')->with('success', 'Contact updated!');
    }
Now, you need to add the edit template. Inside the resources/views/contacts/, create an edit.blade.php file:
$ touch edit.blade.php
Open the resources/views/contacts/edit.blade.php file and add this code:
@extends('base')
@section('main')
<div class="row">
    <div class="col-sm-8 offset-sm-2">
        <h1 class="display-3">Update a contact</h1>

        @if ($errors->any())
        <div class="alert alert-danger">
            <ul>
                @foreach ($errors->all() as $error)
                <li>{{ $error }}</li>
                @endforeach
            </ul>
        </div>
        <br />
        @endif
        <form method="post" action="{{ route('contacts.update', $contact->id) }}">
            @method('PATCH')
            @csrf
            <div class="form-group">

                <label for="first_name">First Name:</label>
                <input type="text" class="form-control" name="first_name" value={{ $contact->first_name }} />
            </div>

            <div class="form-group">
                <label for="last_name">Last Name:</label>
                <input type="text" class="form-control" name="last_name" value={{ $contact->last_name }} />
            </div>

            <div class="form-group">
                <label for="email">Email:</label>
                <input type="text" class="form-control" name="email" value={{ $contact->email }} />
            </div>
            <div class="form-group">
                <label for="city">City:</label>
                <input type="text" class="form-control" name="city" value={{ $contact->city }} />
            </div>
            <div class="form-group">
                <label for="country">Country:</label>
                <input type="text" class="form-control" name="country" value={{ $contact->country }} />
            </div>
            <div class="form-group">
                <label for="job_title">Job Title:</label>
                <input type="text" class="form-control" name="job_title" value={{ $contact->job_title }} />
            </div>
            <button type="submit" class="btn btn-primary">Update</button>
        </form>
    </div>
</div>
@endsection
U: Implementing the Delete Operation
Finally, we'll proceed to implement the delete operation. Go to the app/Http/Controllers/ContactController.php file, locate the destroy() method and update it accordingly:
    public function destroy($id)
    {
        $contact = Contact::find($id);
        $contact->delete();

        return redirect('/contacts')->with('success', 'Contact deleted!');
    }
You can notice that when we redirect to the /contacts route in our CRUD API methods, we also pass a success message but it doesn't appear in our index template. Let's change that!
Go to the resources/views/contacts/index.blade.php file and add the following code:
<div class="col-sm-12">

  @if(session()->get('success'))
    <div class="alert alert-success">
      {{ session()->get('success') }}
    </div>
  @endif
</div>
We also need to add a button to takes us to the create form. Add this code below the header:
    <div>
    <a style="margin: 19px;" href="{{ route('contacts.create')}}" class="btn btn-primary">New contact</a>
    </div>
This is a screenshot of the page after we created a contact:

Conclusion
We've reached the end of this tutorial. We created a REST API CRUD application with Laravel 8, PHP 7 and MySQL. Next, you can learn how to add authentication to your Laravel 8 app.
-
Date:


