React Bootstrap Tutorial: Integrating Bootstrap 4 with React
In this tutorial we'll learn how to integrate Bootstrap 4 with React by building a simple example React application and style the UI with common Bootstrap components such as the grid system (container, row and col classes), navigation bars and cards.
Bootstrap 4 is the most popular CSS framework for building responsive layouts with many new features such as the support for Flexbox and a new Card component.
React is the most popular UI library for building web user interfaces that makes use of a component-based paradigm and a virtual DOM.
Virtual DOM refers to a programming concept where a virtual representation of a UI is kept in memory and synced with the real DOM by a library such as ReactDOM. This process is called reconciliation.
Bootstrap 4 depends on both jQuery and Popper.js but using jQuery with React is not recommended since jQuery uses direct DOM manipulation.
If you need to add to add Bootstrap 4 styling to your React app the community has created some packages for making it possibly to use Bootstrap 4 without jQuery but still be able to use the complete features and components of BS 4.
How to Add Bootstrap 4 to your React Application
Integrating Bootstrap with React can be achieved in various ways, such as:
- Importing Bootstrap from a CDN,
- Installing Bootstrap from
npm, - Using React Bootstrap package like Reactstrap
In this tutorial we'll explore these methods in more details.
How to use Bootstrap 4 from a CDN in React
Let's see the first method of integrating Bootstrap with React i.e via a CDN. This approach is the easist one since you only need to add a <link> tag pointing to a Bootstrap CDN in the public/index.html file of your React application.
Provided that you have generated a React project with the create-react-app tool, navigate to your project's root folder and open the public/index.html file then add the following code in the <head> section:
<link rel="stylesheet" href="https://stackpath.bootstrapcdn.com/bootstrap/4.1.3/css/bootstrap.min.css" integrity="sha384-MCw98/SFnGE8fJT3GXwEOngsV7Zt27NXFoaoApmYm81iuXoPkFOJwJ8ERdknLPMO" crossorigin="anonymous">
If you need to use Bootstrap components that depend on JavaScript/jQuery in your React application, you also need to include jQuery, Popper.js and Bootstrap.js in your document. Add the following imports before the closing </body> tag:
<script src="https://code.jquery.com/jquery-3.3.1.slim.min.js"
integrity="sha384-q8i/X+965DzO0rT7abK41JStQIAqVgRVzpbzo5smXKp4YfRvH+8abtTE1Pi6jizo"
crossorigin="anonymous"></script>

<script src="https://cdnjs.cloudflare.com/ajax/libs/popper.js/1.14.0/umd/popper.min.js"
integrity="sha384-cs/chFZiN24E4KMATLdqdvsezGxaGsi4hLGOzlXwp5UZB1LY//20VyM2taTB4QvJ"
crossorigin="anonymous"></script>

<script src="https://stackpath.bootstrapcdn.com/bootstrap/4.1.0/js/bootstrap.min.js"
integrity="sha384-uefMccjFJAIv6A+rW+L4AHf99KvxDjWSu1z9VI8SKNVmz4sk7buKt/6v9KI65qnm"
crossorigin="anonymous"></script>
That's it. You have now added Bootstrap in your React application. You should be able to use all the CSS utilities and UI components available from Bootstrap in your application.
Note: Please note that you are not required to use the
create-react-apptool to scaffold your application. The important thing is that you need to add the imports to theindex.htmlfile of your project.
Adding Bootstrap in React Using NPM
You can also import Bootstrap in your React application by installing it from npm.
Provided that you have a React project. Open a new terminal window, navigate to your project's folder and run the following command:
$ npm install bootstrap --save
After installing the bootstrap package, you will need to import it in your React app entry file.
If you generated your project using the create-react-app tool; open the src/index.js file and add the following code:
import 'bootstrap/dist/css/bootstrap.min.css';
You can now use the CSS classes and utilities in your application but if you need to use the JavaScript components, you will also need to install the jquery and popper.js packages from npm. In your terminal, run the following commands:
$ npm install jquery popper.js
Next, go to the src/index.js file and add the following imports:
import $ from 'jquery';
import Popper from 'popper.js';
import 'bootstrap/dist/js/bootstrap.bundle.min';
That's it. You can now use the full power of Bootstrap in your React application.
Using Community-Packages for Integrating Bootstrap 4 with React
The last approach that you can use to add Bootstrap to your React application is by using some packages built by the community which aim to rebuild Bootstrap components as React components such as:
- react-bootstrap: React bootstrap replaces the Bootstrap javascript. Each component has been built from scratch as true React components, without uneeded dependencies like jQuery.
- reactstrap: This library contains React Bootstrap 4 components that favor composition and control. The library does not depend on jQuery or Bootstrap javascript. However, react-popper is needed for advanced positioning of content like Tooltips, Popovers, and auto-flipping Dropdowns.
React Bootstrap Example
Let's now see a practical example of how to use the reactstrap package to build a simple application and style the UI with Bootstrap.
Prerequisites
In order to follow the steps in this tutorial, you need to have some prerequisites such as:
- Working experience with JavaScript,
- Familiarity with React,
- Node.js and NPM installed on your development machine. These are required by the
create-react-apputility that can be used to scaffold and work with React apps but not React itself.
Installing create-react-app
Let's start by installing the create-react-app tool which is the official tool for working with React projects. Open a terminal and run the following command:
$ npm install -g create-react-app
Note: The previous command will install
create-react-appglobally on your system so you may need to add sudo before your command in debian-based systems or macOS or use an administrator command prompt in Windows. You can also just fix your npm permissions in order the run the command without issues.
Creating a React Project
After installing the utility, let's use it to create our React application. Head back to your terminal and run the following command:
$ cd ~
$ create-react-app react-bootstrap-example
Next, navigate to your project's root folder and start a local development server using the following commands:
$ cd react-bootstrap-example
$ npm start
You server will be running from the http://localhost:3000 address.
Leave the terminal running the development server running and open a new terminal for running the rest of the commands in this tutorial.
Installing bootstrap and reactstrap
After generating your project, you can now navigate to its folder and install the dependencies by running the following commands:
$ cd react-bootstrap-example
$ npm install --save bootstrap reactstrap
Note: We need to install bootstrap because
react-bootstraprequires the Bootstrap 4 CSS filesAt the time of this writing, the
reactstrapv8.0.0 andbootstrapv4.3.1 are installed.
Importing Bootstrap
Next, open the src/index.js file and add the following code to import Bootstrap CSS file:
import 'bootstrap/dist/css/bootstrap.css';
You can also use a <link> tag in your project index.html file.
You can then import individual Bootstrap 4 components and use them.
Fetching JSON Data
Open the src/App.js and add a contacts state variable for holding data fetched from the server:
class App extends Component {
  state = {
    contacts: []
  }
Next, add a componentDidMount() life-cycle method and fetch JSON data from the remote server and call the React setState method to set the contacts state to the fetched data:
  componentDidMount() {
    fetch('http://jsonplaceholder.typicode.com/users')
    .then(res => res.json())
    .then((data) => {
      this.setState({ contacts: data })
      console.log(this.state.contacts)
    })
    .catch(console.log)
  }
Note: You can also use Axios with React to fetch data from servers.
Bootstrap Navigation Bar
reactstrap provides a Navbar component which represents a responsive Bootstrap 4 navigation bar component.
A Navbar may contain other components like NavbarBrand, Nav, NavItem, etc. for building a navigation bar with various types of links.
Add the following imports:
import { Fragment } from 'react';
import {
  Navbar, NavbarBrand, Nav, NavItem, NavLink
} from 'reactstrap';
Next, change the render() method as follows:
  render() {

    return (
      <Fragment>
        <Navbar color="faded" light expand="md">

          <NavbarBrand href="/">
            React Bootstrap Example
          </NavbarBrand>
          <Nav className="ml-auto" navbar>

            <NavItem className="d-flex align-items-center">
              <NavLink className="font-weight-bold" href="/">Home</NavLink>
            </NavItem>
            <NavItem className="d-flex align-items-center">
              <NavLink className="font-weight-bold" href="https://www.techiediaries.com/react-bootstrap">
                Tutorial
              </NavLink>
            </NavItem>


          </Nav>
        </Navbar>
      </Fragment>
    );
  }
We used a React Fragment to be able to return multiple elements from our render() method.
According to the official docs:
A common pattern in React is for a component to return multiple elements. Fragments let you group a list of children without adding extra nodes to the DOM.
Note: You can make the NavBar responsive by adding a
<NavbarToggler>inside our<Navbar>component and then wrap<NavItems>into a<Collapse>component.
At this point, this is a screenshot of our Bootstrap 4 navigation bar:

Next, let's add a Container component and display the contacts data with a Card component for each contact. First, add the following imports:
import {
  Container, Row, Col, Navbar, NavbarBrand, Nav, NavItem, NavLink, Card, CardBody, CardTitle, CardSubtitle, CardText, Button
} from 'reactstrap';
Next update the render() method as follows:
  render() {

    return (
      <Fragment>
        <Navbar color="faded" light expand="md">

          <NavbarBrand href="/">
            React Bootstrap Example
          </NavbarBrand>
          <Nav className="ml-auto" navbar>

            <NavItem className="d-flex align-items-center">
              <NavLink className="font-weight-bold" href="/">Home</NavLink>
            </NavItem>
            <NavItem className="d-flex align-items-center">
              <NavLink className="font-weight-bold" href="https://www.techiediaries.com/react-bootstrap">
                Tutorial
              </NavLink>
            </NavItem>


          </Nav>
        </Navbar>

        <Container fluid>


          <Row>
            <Col>
              {this.state.contacts.map((contact) => (

                <Card color="primary">
                  <CardBody>
                    <CardTitle className="h3 mb-2 pt-2 font-weight-bold">{contact.name}</CardTitle>
                    <CardSubtitle className="mb-3 font-weight-light text-uppercase" style=>{contact.email}</CardSubtitle>
                    <CardText className="mb-4" style=> {contact.company.catchPhrase}</CardText>
                    <Row>

                    <Col xs=>
                          <Button color="success">Call</Button>
                    </Col>
                    <Col sm={'auto'}>
                          <Button color="warning">Message</Button>
                    </Col>
                    <Col sm={'auto'}>
                          <Button color="success">Email</Button>
                    </Col>
                    </Row>
                  </CardBody>
                </Card>


              ))}
            </Col>
          </Row>

        </Container>
      </Fragment>
    );
  }
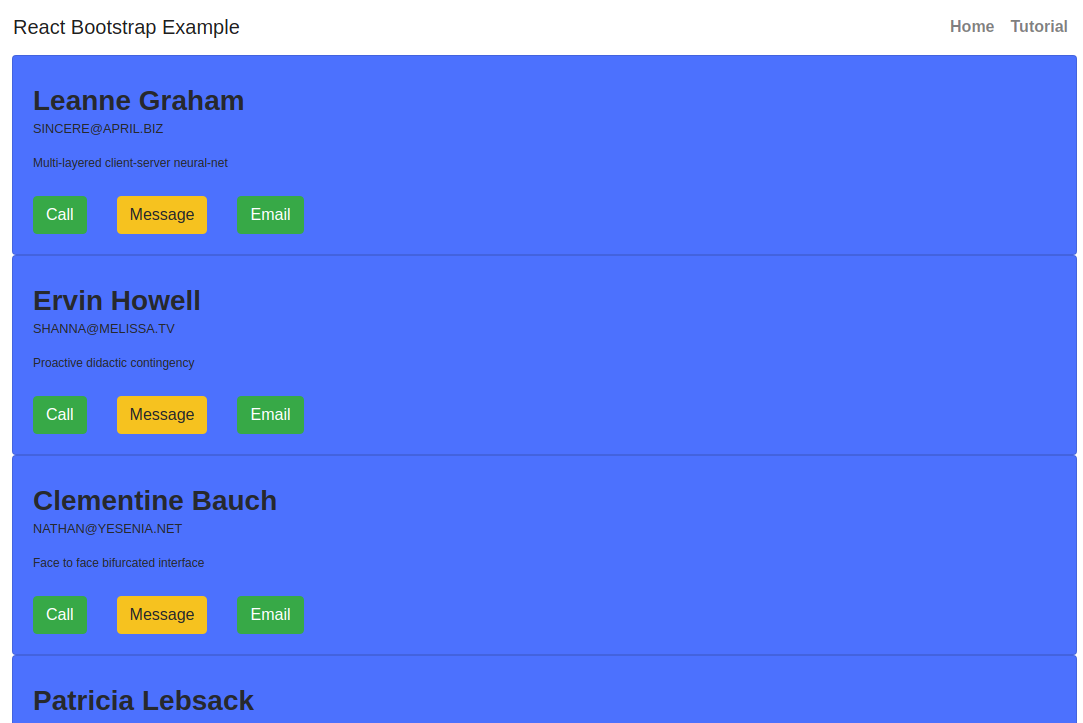
This is a screenshot of our Bootstrap-styled UI:
Conclusion
In this tutorial we've seen various ways to integrate Bootstrap 4 with React to build professional looking user interfaces then created a demo example that shows how to use React and the react-bootstrap package to build a simple application that fetches contacts data from a remote server and use a Bootstrap 4 Card to show each contact.


